Its a really simple process but the cure time is very long. You dont have to move fast so take your time.  For this method, youll need two types of Mod Podge. You can go ahead and paint it or spray paint it but just be sure to give it a really long time to dry before applying the vinyl. Now you are ready to place the design onto the acrylic keychain.
  This is because the act of brushing on glue would likely wrinkle the page or smear the ink. The overall quality may not be the same, but its worth the try. Once you have put on the third coat, it needs to then cure for quite a long time about 28 days. Make sure to read through and take note of the pros and cons before making your choice. However, spray sealers are best for thin, delicate, or printed papers, such as photographs, stamps, and book and magazine pages. All the tips and tricks that nobody tells you when you start. , Today were going to show you three different methods. Use code "FLASH30" and save $30 on your best value membership today!
The resin itself is completely safe to use, as it is non-toxic and even food-safe once it has cured. Now lets talk about the plastic plaque that we have here from Chalk Couture. Welcome! Epoxy is formulated to last a lifetime and is extremely strong and resilient, which is why it is perfect for a surface that will have food and liquids spilt on it. This guide will take you through the basics, from selecting and preparing your paper to applying the resin. So, to keep this nice for years and years to come, grab some polyurethane spray.
Dries to the touch in 10 to 15 minutes. It is always best to seal the photo first with a few coats of a spray sealer.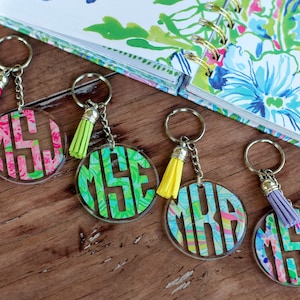 Use a heat torch or hair dryer to blow hot hair over the resin surface in order to remove bubbles by forcing them to rise to the surface. If this happens dont panic. We've created your Go-To Guide to start working with Epoxy Resin. Choosing a selection results in a full page refresh. Carefully prepare your tumbler by sanding and washing it then applying your flat paint. Youll need an oven for this method to help the clear acrylic spray cure well. I am going to use StyleTechCraft opal and Gloss Craft vinyl on my keychains. They were fun and the opal is always a show stopper! Let it dry for 24 hours.
The Mod Podge also has limited application, and baking clear acrylic finish is not always an option for all designs. I got a napkin and wiped it all of the back. Fewer quality issues on your finished tumbler, Needs 8-10 applications or more depending on the thickness you want, Requires 30 days to cure but can be used in 5 days, For this method, youll need two types of Mod Podge. Once these parts have been mixed, a chemical reaction will ensue, resulting in the resin curing into a hardened substance. Love those colors. Continue adding coats of BT (sanding every 3 coats) until you are satisfied with the finish. Be sure to come back to this tutorial again and again whenever you are working on a die-cutting craft project and want to add some extra protection to it with a sealant. Failure to mix the two parts together thoroughly will result in problems with your resin later on. You do not need to worry, however, as these dried edges can be removed easily with some scissors. Here are some printable instructions for you if you want them! The opal will shimmer in the background and make the text stand out.
Instead of writing and snapping a screen shot of each step. and pat the glitters on with parchment paper. I feel like I personally get better and more even coverage. I am definitely a beginner to the UV Resin crafts. After you do 3-4 coats of BT, let it dry over night. You will see all the bubbles pop and youll get that smooth flawless finish. Let it dry.
CrystaLac takes 5 days to be thoroughly dried and 30 days to cure to an inert state. This is arguably the most important step, as failing to seal your image before you apply the resin will result in unsightly splotches and uneven marks and dark spots. This diy keychain makes a great add on to your handmade shop or great personalized gives for your friends and family.
This means that you cannot leave your tumblers in the water or other liquids for extended periods. When you say the crystalac is safe to use after 5 days but not fully cured, what does that mean? It's important to be aware of them to help manage your expectations.
You can find it in my Resource Library. Be careful around the hole for the keychain. Before curing the resin, use a lighter to go over the resin before curing and it gets rid of the bubbles. It is imperative that you learn how to seal paper for resin first in order to prevent the epoxy from soaking into the paper.
This way, you can seal them all at the same time and have a good selection of pre-sealed papers from which to choose for any future projects. How to Seal Paper Art with a Spray Sealer. However, overexposure to epoxy causes several serious health issues, such as dermatitis, chemical burns, and respiratory irritation. how to make a diy keychain using acrylic blanks tutorial will show you how to make an acrylic keychain without epoxy or uv resin! Pour the resin into the center of the paper or the mold and spread it to the edges with a popsicle stick or plastic spreader. LOL! Resin-coated paper is exactly what it sounds like: paper that has been coated in a layer of epoxy resin. You should follow StyleTechCraft on Facebook. The most significant disadvantage of using CrystaLac is the curing time, although epoxy also needs 30 days to be fully cured and inert. and pour it over your tray. It will provide an intense glossy shine to your pieces, protecting them from any wear and tear. You can use photographs, cardboard, stickers, tissue paper, and even book pages in your resin creations. if(typeof ez_ad_units != 'undefined'){ez_ad_units.push([[300,250],'glytterati_com-large-leaderboard-2','ezslot_4',125,'0','0'])};if(typeof __ez_fad_position != 'undefined'){__ez_fad_position('div-gpt-ad-glytterati_com-large-leaderboard-2-0')}; Although there are various alternatives on how to seal a glitter tumbler without epoxy, we found that CrystaLac is the best choice since it is water-based, does not contain aerosol, and does not induce allergic reactions. UV Resin is often promoted as a practical alternative to conventional epoxy resins. I created the cut file Thank you for helping me grow! It is perfect to use with flower or plant designs and works great for a teacher. I didnt notice the little bubbles in mine until it was too late. Using the best epoxy for tumblers is essential to make the item long-lasting, glossy, and water-resistant. With this resin, you simply mix up equal parts A and B. This article will take you through the ins and outs of creating your own resin-coated paper. and wash off the glitter dust. Were using a wood, ceramic, and plastic material here. Prepare your tumbler as recommended to remove all substances that may affect the adhesion of the glitters. We recommend that you cover the entire mug and not just the decal because you will see some little brushstrokes. Apply a thin layer of CrystaLac and let it dry for 4 hours. Click on Browse and find the file where you want to save this file. In this article, we will show you how to seal a glitter tumbler without epoxy.if(typeof ez_ad_units != 'undefined'){ez_ad_units.push([[300,250],'glytterati_com-medrectangle-3','ezslot_0',102,'0','0'])};if(typeof __ez_fad_position != 'undefined'){__ez_fad_position('div-gpt-ad-glytterati_com-medrectangle-3-0')}; There are various ways on how to seal a tumbler without using epoxy. This is the blue opal leaf design partially weeded. Look in the Cricut and Silhouette cut files section. It gives the same shine as epoxy, but it does not have allergic reactions because it is water-based. It will become dry to the touch within just 10 to 15 minutes, and can be handled after 2 hours.
Apply a thin coat and sprinkle on your glitter. The glossy, crystal-clear surface of art-specific resins is ideal for using paper in creating coasters, jewelry, bookmarks, collages, and more. I like to add my glitter to the blanks with Brite Tone. You can use any kind of paper with resin, provided it has been sealed first. To seal the paper, place the piece on a protected plastic surface and apply several layers of your chosen sealant to one side of the page. It is best to choose a resin that has been formulated specially for the use of art-related projects, as these will be easy to use and should provide a long-lasting, crystal-clear layer of protection for your pieces. Once youre satisfied with your finish, let the blank dry and then you can add your hardware! I always start with 99. If you are a crafty person like me then take a look around. Site by KETZ. One tip we have is that before it dries, go in there with a lighter and very intentionally kind of move that lighter around quickly on the surface. The other alternatives take less time, but the quality is not as good as epoxy. how to make a diy keychain using acrylic blanks tutorial will show you how to make an acrylic keychain without epoxy or uv resin! You may also require a respiratory mask depending on the nature of the fumes. Get it all the way to the edges. No matter how safe or non-toxic a resin claims to be, you should always take the proper protective measures when working with this substance in its liquid state. Use the gloss luster Mod Podge for the first three layers and the dishwasher-safe Mod Podge for the fourth and fifth layers. Subscribe to our Newsletter to receive offers every week! There are three ways that you can seal craft projects, including those with vinyl. After that two hours is up, flatten the glitter with your finger or even a rubber brayer.
Press the space key then arrow keys to make a selection. As an Amazon Associate and member of other affiliate programs, I earn from qualifying purchases. Like wood, paper is porous. This needs to dry 2 hours!
These are three amazing ways to seal your projects no matter what kind of project you have made. Use plastic mixing cups to measure your resin exactly and accurately by volume. use crystalac brite tone to Prep is important for any project, even these acrylic blanks! Otherwise it will cure it on the back too.
Tape off the part you dont want to apply epoxy. Please note, comments must be approved before they are published.
If youd rather not use the spray, we also really love the liquid polyurethane. The keychains come with a protective paper on each side so first remove these pieces. Important note: Dishwasher-safe Mod Podge isnt food safe so you want to be sure to keep it away from the rim of the mug where your lips will touch it. In the following article, you will learn a lot of interesting facts about this resin for the impatient and receive instructions on, Read More UV Resin How to use UV Resin [Tutorial]Continue. Start your journey with Epoxy Resin the most efficient way and create stunning Resin pieces. Cute keychains are the perfect small gift. Give your mug 2 to 3 coats of the Mod Podge, letting it dry for a couple of hours in between each one. Apply Mod Podge with a brush applicator, then cover your tumbler with glitters. Which of these epoxy alternatives would you like to try to seal your glitter tumbler? Obviously, we all want to make them last as long as possible. I made the mistake of going too fast and it went into the hole and got on the back of the blank. Prep the opposite side of the blank by sanding with 400 grit sand paper. You will also find out which materials are suitable for your resin projects. Apply a coat of Glitter Glue over the top and let dry for 2 hours. The clear acrylic finish can be baked to improve quality and curing time, but theres no such luck for CrystaLac and Mod Podge.if(typeof ez_ad_units != 'undefined'){ez_ad_units.push([[300,250],'glytterati_com-banner-1','ezslot_2',124,'0','0'])};if(typeof __ez_fad_position != 'undefined'){__ez_fad_position('div-gpt-ad-glytterati_com-banner-1-0')}; CrystaLac reacts with alcohol ink, so you cannot use this design for your tumblers. Your cured piece will be highly durable and even resistant to relatively high temperatures. It offers a high durability floor finish for a busy garage space. When you pair them with vinyl from StyleTechCraft you cannot go wrong. Now that your paper has been sufficiently sealed, you can prepare and apply the resin. There is no mixing epoxy and it only takes minutes to cure. Cure under the light for 99 more seconds. With a moisture-resistant and smudge-proof formulation, this spray will protect and seal your artwork with a crystal-clear glossy finish. The sealant you choose is dependent on what kind of paper you are working on. You want to make sure that your vinyl adheres well and that nothing comes up with the transfer paper. You will require the following materials to make resin paper: In this step, you can cut out your chosen paper into a variety of shapes, depending on your desired goal. There are a number of reasons for doing this. If necessary, apply a second coat after that 4 hours. Continue adding coats of BT (sanding every 3 coats) until you are satisfied with the finish. Not as water-resistant as CrystaLac or epoxy. CrystaLac takes 5 days to be thoroughly dried and 30 days to cure to an inert state. Let it dry overnight. The other alternatives take less time, but the quality is not as good as epoxy. This one is completely weeded and ready for transfer tape. You can add your decals before the last two coats to seal in the decals. Cover with glitters and gently tap to remove excess glitters. Disclosure: Some of the links below are affiliate links provided for your convenience.
The overall quality may not be the same, but its worth the try. Make sure to cover it up with a poster board or a cooking tray or something like that to keep dust and debris away from it as it dries. Lets suppose you want to put a monogram on this and hang it on your front door. if(typeof ez_ad_units != 'undefined'){ez_ad_units.push([[250,250],'glytterati_com-box-4','ezslot_6',104,'0','0'])};if(typeof __ez_fad_position != 'undefined'){__ez_fad_position('div-gpt-ad-glytterati_com-box-4-0')}; Here are some of the most common issues when dealing with glitter tumblers without epoxy. Can it be washed after 5 days? This art resin is the perfect choice for any of your artworks or art-related projects. Those are a spray sealer like polyurethane polyacrylic spray, dishwasher safe Mod Podge, or an epoxy. Alison Sullivan, 2022. Posted on Last updated: July 5, 2021 By: Author Michelle, Categories Crafts, Crafty Gifts, Cricut, DIY. There are a number of steps involved in creating your own resin-coated paper. However, there are many varieties of epoxy paint and there are particular steps that you will need to take, Read More Epoxy Paint for Wood Epoxy Coating for Wood FloorsContinue, For the perfect glass-like surface on your epoxy resin work piece, sanding after curing is essential. It will give you a really beautiful finished look! This top-rated spray sealant is ideal for use on your paper projects, as well as on wood, glass, metal, ceramic, and many other surfaces. Use the. To seal vinyl decals on mugs, simply cover the entire mug with some dishwasher-safe Mod Podge. Let us know in the comments. The reason for this step is to remove the grit, grease, adhesives, and other substances that can affect your cups quality. Wait until the CrystaLac is fully inert after 30 days before popping it into the dishwasher. If you love fonts like I do they have some really nice fonts and there are thousands to choose from. The best garage floor epoxy provides resistance to frequent use, chemicals, oil spills, scratches, and any marks or deposits left from hot tires. You want to make sure the epoxy covers the whole bottom. Carefully line up the design and place it down. This is a premium-quality resin from a well-known brand that will help your art pieces to stand the test of time. You will want to find it in there and right click on the file. And for which workpieces is it particularly suitable? Best of all, it can now be thrown right into the dishwasher for cleaning! So today, Im going to show you three different techniques for sealing vinyl decal die cutting craft projects. 99 seconds, 60 seconds and 30 seconds. They can really stand out if only on the vinyl, but it looks like it was meant to be that way if you cover the whole mug.
You can spray your tumbler with flat paint so that the stainless steel finish of the tumbler. Use left/right arrows to navigate the slideshow or swipe left/right if using a mobile device. They work great for this.
To avoid the resin from causing dark spots, stains, or uneven patches on the page, it is important to seal the paper before applying any epoxy. Various Materials introduced, Best Garage Floor Epoxy Garage Floor Epoxy Coating Tutorial, KRYLON Acrylic Aerosol Spray Paint, Crystal Clear, 11 oz, MOD PODGE Waterbase Sealer and Matte Finish for Paper, 16 oz, How to Draw Eyes An Easy Realistic Eye Drawing Tutorial, Acrylic Painting Ideas Easy and Fun Painting Ideas For Beginners, Zorn Palette Everything You Need to Know About Zorn Palette Colors, Specifically designed for art projects, excellent color stability, Very easy to use with 1 : 1 mixing ratio, 100% solids, hard-shell finish, High gloss and crystal clear, your all-seal solution, excellent air release. You are sure to find something you love! When they are finished add the keychain parts and the fun tassel to the super cool keychain. Then dishwasher safe after 30? The clear acrylic finish can be baked to improve quality and curing time, but theres no such luck for CrystaLac and Mod Podge. Even if you use premium outdoor vinyl or permanent vinyl, that vinyl will fall off eventually and start curling up either in icy cold temperatures or in the heat and so on! You can also use a toothpick to pop bubbles. If you are wondering about settings for the Cricut Joy or how to cut two colors of vinyl at the same time then please watch. There are two ways in which you can learn how to seal paper art: with a sealer spray or with decoupage glue. However, overexposure to epoxy causes several serious health issues, such as dermatitis, chemical burns, and respiratory irritation.
Decoupage or art glue is great way to seal thicker papers such as cardstock or sticker paper. You could create a paper collage or cut out small circles with a craft punch to use as a pendant backing in jewelry. They both work great! Including several detailed tutorials for your first projects. But here is a great tip I learned. In addition, you will receive step-by-step instructions on how to best proceed when sanding a resin, Read More Sanding Epoxy Resin Helpful Tutorial on how to Sand ResinContinue, While using epoxy in any of your projects, it is necessary to comprehend which materials it sticks to and to which it doesnt. How lovely, Michelle, and the opal vinyl is soooooo gorgeous. The following includes just a few examples of what you could create with paper and resin: The short answer is yes.
To display your Instagram posts, double-click here to add an account or select an existing connected account. Resin is a highly durable substance that can enhance the look of your artwork whilst providing a great deal of protection. These are the lights used to dry gel nails. What Material, Read More What does Epoxy not stick to? Mix them together for three minutes. Always take care to read the manufacturers directions for the proper mixing ratio and length of time for which the resin and hardener must be mixed together.
While you can cover glossy photo paper with resin, the act of doing so can very often end up smudging the photo ink. Give it a scuff sand with 400 grit sand paper and wipe it clean.
These are beautiful; I've never used resin but this project seems like a great beginner project to start :).
Take your pick the spray or liquid form based on your preferences. The vinyl has a tendency to want to lift up if you dont have a surface thats perfectly smooth. I did the same with the other pink opal design. It was fun and pretty easy. It can be a rabbit hole. Let dry 4 hours. I got my keychain pattern from Creative Fabrica.
Once this layer is cured add the text layer of vinyl then repeat the resin and the lighter process. Remember, you only need a very little bit! Apply 3-4 coats of Brite Tone letting each coat dry for 4 hours. This is a membership site but you can also purchase files without a membership. If you want to seal it two or three times go ahead. Once the front and sides of the front of the paper have been sealed and dried, turn the page over and seal the other side, ensuring that all sides are completely covered. You can cast your paper items in resin to create a beautiful piece of artwork that will not only protect your piece, but will last for a long time as well. Resin paper offers an alternative means of preserving your paper-based art pieces without having to frame them. It will top and not go through if you move it slowly. Except for woodwork, you cannot use the alternatives to epoxy for tumblers for resin crafts like jewelry, keychains, coasters, and more. Always ensure that you take the time to seal your papers properly, leaving no unsealed spots that may get affected by the resin. Moving on to our mug, lets say you want to be able to drink coffee out of this every single morning and you dont really have time to hand wash it all the time. Learn to create fascinating Resin Arts and Crafts within minutes. Your Download limit has been reached - Upgrade to our best value year membership tier today and get ultimate access to our site! For the second and third layers, use a sponge to dab the Mod Podge to prevent the glitters from falling off.
I hope you enjoyed this project. It seemed to take a while but eventually they were no longer tacky. Repeat and sand. Then remove the transfer tape. Add a little resin to the top of the vinyl. If you use them outside, the outdoor weathering can take its toll too. I recently started using the UV resin and it is perfect for these keychains.
Repeat another coat of glitter glue, wait 2 hours, and flatten. The resin and all of the things I can make with it is really starting to grow on me. You will usually require several coats of this sealer type, particularly when working on thicker pieces of paper. Lets start with the wooden tray. Using this spray will improve the contrast of your photographs and artworks. Epoxy resin comes in two liquid parts, being the resin and a hardener. This post may contain affiliate links. I used my weeding tool to get them started. This glue is acid-free, non-toxic, and will not yellow. The opal vinyl is perfect for the background. Why not create your very own Epoxy bar top. I wouldn't have the patience to wait for the epoxy resin to cure. Keychains are a dime a dozenI know but I love to make them. Tanner, Rachel, and Courtney are all here because we love diecutting and especially love sharing fun projects and tutorials with fellow makers. LOL. Place a box over the piece and allow it to cure for the stipulated length of time. They were still tacky so I kept putting them under the light for 30 seconds at a time until they were no longer tacky. If you need more resin just add a little more and keep spreading it over the top. With a simple 1:1 mixing ratio by volume, you will have no trouble using this art resin from ProMarine Supplies! This is my blog about creating fun things including home decor, recycled and up-cycled projects, printables and easy crafts! You may require multiple layers of resin, depending on the project you are doing. until well-covered. CrystaLac method is the most recommended alternative to epoxy. We discussed the steps on how to seal a glitter tumbler without epoxy in the step-by-step instructions above, so check it out. While you can select a resin that is resistant to yellowing, it is important to note that lighter-colored papers can be susceptible to yellowing over time. While it is true that you can wash and use the tumbler applied with CrystaLac after 5 days, it can still change its chemical composition during this time, especially when heat is applied. A light coat of resin will provide a thin, laminate-like piece, whereas a thicker coat will result in a stiffer piece. I even took them outside and put them in the sunshine for a few minutes. The more the better! Spray sealers come in an aerosol can and are sprayed over both sides of the piece of paper. For use on paper, wood, metal, glass, plaster, ceramic, paper mache, etc. Let it dry. A UV-resistant formula means that this crystal-clear resin will not yellow over time. We may earn a small commission from purchases made through them, at no additional cost to you. for the fourth and fifth layers. Meet the Makers Gonna Learn team! Aside from the water-based CrystaLac, Mod Podge and clear acrylic spray do not have a water-resistant finish. To ensure you have no bubbles and can place it properly you can try the wet method: watch this tutorial here.
There a lot to choose from on this site so look around if you want something different.
For this method, youll need two types of Mod Podge. You can go ahead and paint it or spray paint it but just be sure to give it a really long time to dry before applying the vinyl. Now you are ready to place the design onto the acrylic keychain. This is because the act of brushing on glue would likely wrinkle the page or smear the ink. The overall quality may not be the same, but its worth the try. Once you have put on the third coat, it needs to then cure for quite a long time about 28 days. Make sure to read through and take note of the pros and cons before making your choice. However, spray sealers are best for thin, delicate, or printed papers, such as photographs, stamps, and book and magazine pages. All the tips and tricks that nobody tells you when you start. , Today were going to show you three different methods. Use code "FLASH30" and save $30 on your best value membership today! The resin itself is completely safe to use, as it is non-toxic and even food-safe once it has cured.
Now lets talk about the plastic plaque that we have here from Chalk Couture. Welcome! Epoxy is formulated to last a lifetime and is extremely strong and resilient, which is why it is perfect for a surface that will have food and liquids spilt on it. This guide will take you through the basics, from selecting and preparing your paper to applying the resin. So, to keep this nice for years and years to come, grab some polyurethane spray. Dries to the touch in 10 to 15 minutes. It is always best to seal the photo first with a few coats of a spray sealer.
Use a heat torch or hair dryer to blow hot hair over the resin surface in order to remove bubbles by forcing them to rise to the surface. If this happens dont panic. We've created your Go-To Guide to start working with Epoxy Resin. Choosing a selection results in a full page refresh. Carefully prepare your tumbler by sanding and washing it then applying your flat paint. Youll need an oven for this method to help the clear acrylic spray cure well. I am going to use StyleTechCraft opal and Gloss Craft vinyl on my keychains. They were fun and the opal is always a show stopper! Let it dry for 24 hours. The Mod Podge also has limited application, and baking clear acrylic finish is not always an option for all designs. I got a napkin and wiped it all of the back. Fewer quality issues on your finished tumbler, Needs 8-10 applications or more depending on the thickness you want, Requires 30 days to cure but can be used in 5 days, For this method, youll need two types of Mod Podge. Once these parts have been mixed, a chemical reaction will ensue, resulting in the resin curing into a hardened substance. Love those colors. Continue adding coats of BT (sanding every 3 coats) until you are satisfied with the finish. Be sure to come back to this tutorial again and again whenever you are working on a die-cutting craft project and want to add some extra protection to it with a sealant. Failure to mix the two parts together thoroughly will result in problems with your resin later on. You do not need to worry, however, as these dried edges can be removed easily with some scissors. Here are some printable instructions for you if you want them! The opal will shimmer in the background and make the text stand out.
Instead of writing and snapping a screen shot of each step. and pat the glitters on with parchment paper. I feel like I personally get better and more even coverage. I am definitely a beginner to the UV Resin crafts. After you do 3-4 coats of BT, let it dry over night. You will see all the bubbles pop and youll get that smooth flawless finish. Let it dry.
CrystaLac takes 5 days to be thoroughly dried and 30 days to cure to an inert state. This is arguably the most important step, as failing to seal your image before you apply the resin will result in unsightly splotches and uneven marks and dark spots. This diy keychain makes a great add on to your handmade shop or great personalized gives for your friends and family.
This means that you cannot leave your tumblers in the water or other liquids for extended periods. When you say the crystalac is safe to use after 5 days but not fully cured, what does that mean? It's important to be aware of them to help manage your expectations.
You can find it in my Resource Library. Be careful around the hole for the keychain. Before curing the resin, use a lighter to go over the resin before curing and it gets rid of the bubbles. It is imperative that you learn how to seal paper for resin first in order to prevent the epoxy from soaking into the paper.
This way, you can seal them all at the same time and have a good selection of pre-sealed papers from which to choose for any future projects. How to Seal Paper Art with a Spray Sealer. However, overexposure to epoxy causes several serious health issues, such as dermatitis, chemical burns, and respiratory irritation. how to make a diy keychain using acrylic blanks tutorial will show you how to make an acrylic keychain without epoxy or uv resin! Pour the resin into the center of the paper or the mold and spread it to the edges with a popsicle stick or plastic spreader. LOL! Resin-coated paper is exactly what it sounds like: paper that has been coated in a layer of epoxy resin. You should follow StyleTechCraft on Facebook. The most significant disadvantage of using CrystaLac is the curing time, although epoxy also needs 30 days to be fully cured and inert. and pour it over your tray. It will provide an intense glossy shine to your pieces, protecting them from any wear and tear. You can use photographs, cardboard, stickers, tissue paper, and even book pages in your resin creations. if(typeof ez_ad_units != 'undefined'){ez_ad_units.push([[300,250],'glytterati_com-large-leaderboard-2','ezslot_4',125,'0','0'])};if(typeof __ez_fad_position != 'undefined'){__ez_fad_position('div-gpt-ad-glytterati_com-large-leaderboard-2-0')}; Although there are various alternatives on how to seal a glitter tumbler without epoxy, we found that CrystaLac is the best choice since it is water-based, does not contain aerosol, and does not induce allergic reactions. UV Resin is often promoted as a practical alternative to conventional epoxy resins. I created the cut file Thank you for helping me grow! It is perfect to use with flower or plant designs and works great for a teacher. I didnt notice the little bubbles in mine until it was too late. Using the best epoxy for tumblers is essential to make the item long-lasting, glossy, and water-resistant. With this resin, you simply mix up equal parts A and B. This article will take you through the ins and outs of creating your own resin-coated paper. and wash off the glitter dust. Were using a wood, ceramic, and plastic material here. Prepare your tumbler as recommended to remove all substances that may affect the adhesion of the glitters. We recommend that you cover the entire mug and not just the decal because you will see some little brushstrokes. Apply a thin layer of CrystaLac and let it dry for 4 hours. Click on Browse and find the file where you want to save this file. In this article, we will show you how to seal a glitter tumbler without epoxy.if(typeof ez_ad_units != 'undefined'){ez_ad_units.push([[300,250],'glytterati_com-medrectangle-3','ezslot_0',102,'0','0'])};if(typeof __ez_fad_position != 'undefined'){__ez_fad_position('div-gpt-ad-glytterati_com-medrectangle-3-0')}; There are various ways on how to seal a tumbler without using epoxy. This is the blue opal leaf design partially weeded. Look in the Cricut and Silhouette cut files section. It gives the same shine as epoxy, but it does not have allergic reactions because it is water-based. It will become dry to the touch within just 10 to 15 minutes, and can be handled after 2 hours.
Apply a thin coat and sprinkle on your glitter. The glossy, crystal-clear surface of art-specific resins is ideal for using paper in creating coasters, jewelry, bookmarks, collages, and more. I like to add my glitter to the blanks with Brite Tone. You can use any kind of paper with resin, provided it has been sealed first. To seal the paper, place the piece on a protected plastic surface and apply several layers of your chosen sealant to one side of the page. It is best to choose a resin that has been formulated specially for the use of art-related projects, as these will be easy to use and should provide a long-lasting, crystal-clear layer of protection for your pieces. Once youre satisfied with your finish, let the blank dry and then you can add your hardware! I always start with 99. If you are a crafty person like me then take a look around. Site by KETZ. One tip we have is that before it dries, go in there with a lighter and very intentionally kind of move that lighter around quickly on the surface. The other alternatives take less time, but the quality is not as good as epoxy. how to make a diy keychain using acrylic blanks tutorial will show you how to make an acrylic keychain without epoxy or uv resin! You may also require a respiratory mask depending on the nature of the fumes. Get it all the way to the edges. No matter how safe or non-toxic a resin claims to be, you should always take the proper protective measures when working with this substance in its liquid state. Use the gloss luster Mod Podge for the first three layers and the dishwasher-safe Mod Podge for the fourth and fifth layers. Subscribe to our Newsletter to receive offers every week! There are three ways that you can seal craft projects, including those with vinyl. After that two hours is up, flatten the glitter with your finger or even a rubber brayer.
Press the space key then arrow keys to make a selection. As an Amazon Associate and member of other affiliate programs, I earn from qualifying purchases. Like wood, paper is porous. This needs to dry 2 hours!
These are three amazing ways to seal your projects no matter what kind of project you have made. Use plastic mixing cups to measure your resin exactly and accurately by volume. use crystalac brite tone to Prep is important for any project, even these acrylic blanks! Otherwise it will cure it on the back too.
Tape off the part you dont want to apply epoxy. Please note, comments must be approved before they are published.
If youd rather not use the spray, we also really love the liquid polyurethane. The keychains come with a protective paper on each side so first remove these pieces. Important note: Dishwasher-safe Mod Podge isnt food safe so you want to be sure to keep it away from the rim of the mug where your lips will touch it. In the following article, you will learn a lot of interesting facts about this resin for the impatient and receive instructions on, Read More UV Resin How to use UV Resin [Tutorial]Continue. Start your journey with Epoxy Resin the most efficient way and create stunning Resin pieces. Cute keychains are the perfect small gift. Give your mug 2 to 3 coats of the Mod Podge, letting it dry for a couple of hours in between each one. Apply Mod Podge with a brush applicator, then cover your tumbler with glitters. Which of these epoxy alternatives would you like to try to seal your glitter tumbler? Obviously, we all want to make them last as long as possible. I made the mistake of going too fast and it went into the hole and got on the back of the blank. Prep the opposite side of the blank by sanding with 400 grit sand paper. You will also find out which materials are suitable for your resin projects. Apply a coat of Glitter Glue over the top and let dry for 2 hours. The clear acrylic finish can be baked to improve quality and curing time, but theres no such luck for CrystaLac and Mod Podge.if(typeof ez_ad_units != 'undefined'){ez_ad_units.push([[300,250],'glytterati_com-banner-1','ezslot_2',124,'0','0'])};if(typeof __ez_fad_position != 'undefined'){__ez_fad_position('div-gpt-ad-glytterati_com-banner-1-0')}; CrystaLac reacts with alcohol ink, so you cannot use this design for your tumblers. Your cured piece will be highly durable and even resistant to relatively high temperatures. It offers a high durability floor finish for a busy garage space. When you pair them with vinyl from StyleTechCraft you cannot go wrong. Now that your paper has been sufficiently sealed, you can prepare and apply the resin. There is no mixing epoxy and it only takes minutes to cure. Cure under the light for 99 more seconds. With a moisture-resistant and smudge-proof formulation, this spray will protect and seal your artwork with a crystal-clear glossy finish. The sealant you choose is dependent on what kind of paper you are working on. You want to make sure that your vinyl adheres well and that nothing comes up with the transfer paper. You will require the following materials to make resin paper: In this step, you can cut out your chosen paper into a variety of shapes, depending on your desired goal. There are a number of reasons for doing this. If necessary, apply a second coat after that 4 hours. Continue adding coats of BT (sanding every 3 coats) until you are satisfied with the finish. Not as water-resistant as CrystaLac or epoxy. CrystaLac takes 5 days to be thoroughly dried and 30 days to cure to an inert state. Let it dry overnight. The other alternatives take less time, but the quality is not as good as epoxy. This one is completely weeded and ready for transfer tape. You can add your decals before the last two coats to seal in the decals. Cover with glitters and gently tap to remove excess glitters. Disclosure: Some of the links below are affiliate links provided for your convenience.
The overall quality may not be the same, but its worth the try. Make sure to cover it up with a poster board or a cooking tray or something like that to keep dust and debris away from it as it dries. Lets suppose you want to put a monogram on this and hang it on your front door. if(typeof ez_ad_units != 'undefined'){ez_ad_units.push([[250,250],'glytterati_com-box-4','ezslot_6',104,'0','0'])};if(typeof __ez_fad_position != 'undefined'){__ez_fad_position('div-gpt-ad-glytterati_com-box-4-0')}; Here are some of the most common issues when dealing with glitter tumblers without epoxy. Can it be washed after 5 days? This art resin is the perfect choice for any of your artworks or art-related projects. Those are a spray sealer like polyurethane polyacrylic spray, dishwasher safe Mod Podge, or an epoxy. Alison Sullivan, 2022. Posted on Last updated: July 5, 2021 By: Author Michelle, Categories Crafts, Crafty Gifts, Cricut, DIY. There are a number of steps involved in creating your own resin-coated paper. However, there are many varieties of epoxy paint and there are particular steps that you will need to take, Read More Epoxy Paint for Wood Epoxy Coating for Wood FloorsContinue, For the perfect glass-like surface on your epoxy resin work piece, sanding after curing is essential. It will give you a really beautiful finished look! This top-rated spray sealant is ideal for use on your paper projects, as well as on wood, glass, metal, ceramic, and many other surfaces. Use the. To seal vinyl decals on mugs, simply cover the entire mug with some dishwasher-safe Mod Podge. Let us know in the comments. The reason for this step is to remove the grit, grease, adhesives, and other substances that can affect your cups quality. Wait until the CrystaLac is fully inert after 30 days before popping it into the dishwasher. If you love fonts like I do they have some really nice fonts and there are thousands to choose from. The best garage floor epoxy provides resistance to frequent use, chemicals, oil spills, scratches, and any marks or deposits left from hot tires. You want to make sure the epoxy covers the whole bottom. Carefully line up the design and place it down. This is a premium-quality resin from a well-known brand that will help your art pieces to stand the test of time. You will want to find it in there and right click on the file. And for which workpieces is it particularly suitable? Best of all, it can now be thrown right into the dishwasher for cleaning! So today, Im going to show you three different techniques for sealing vinyl decal die cutting craft projects. 99 seconds, 60 seconds and 30 seconds. They can really stand out if only on the vinyl, but it looks like it was meant to be that way if you cover the whole mug.
You can spray your tumbler with flat paint so that the stainless steel finish of the tumbler. Use left/right arrows to navigate the slideshow or swipe left/right if using a mobile device. They work great for this.
To avoid the resin from causing dark spots, stains, or uneven patches on the page, it is important to seal the paper before applying any epoxy. Various Materials introduced, Best Garage Floor Epoxy Garage Floor Epoxy Coating Tutorial, KRYLON Acrylic Aerosol Spray Paint, Crystal Clear, 11 oz, MOD PODGE Waterbase Sealer and Matte Finish for Paper, 16 oz, How to Draw Eyes An Easy Realistic Eye Drawing Tutorial, Acrylic Painting Ideas Easy and Fun Painting Ideas For Beginners, Zorn Palette Everything You Need to Know About Zorn Palette Colors, Specifically designed for art projects, excellent color stability, Very easy to use with 1 : 1 mixing ratio, 100% solids, hard-shell finish, High gloss and crystal clear, your all-seal solution, excellent air release. You are sure to find something you love! When they are finished add the keychain parts and the fun tassel to the super cool keychain. Then dishwasher safe after 30? The clear acrylic finish can be baked to improve quality and curing time, but theres no such luck for CrystaLac and Mod Podge. Even if you use premium outdoor vinyl or permanent vinyl, that vinyl will fall off eventually and start curling up either in icy cold temperatures or in the heat and so on! You can also use a toothpick to pop bubbles. If you are wondering about settings for the Cricut Joy or how to cut two colors of vinyl at the same time then please watch. There are two ways in which you can learn how to seal paper art: with a sealer spray or with decoupage glue. However, overexposure to epoxy causes several serious health issues, such as dermatitis, chemical burns, and respiratory irritation.
Decoupage or art glue is great way to seal thicker papers such as cardstock or sticker paper. You could create a paper collage or cut out small circles with a craft punch to use as a pendant backing in jewelry. They both work great! Including several detailed tutorials for your first projects. But here is a great tip I learned. In addition, you will receive step-by-step instructions on how to best proceed when sanding a resin, Read More Sanding Epoxy Resin Helpful Tutorial on how to Sand ResinContinue, While using epoxy in any of your projects, it is necessary to comprehend which materials it sticks to and to which it doesnt. How lovely, Michelle, and the opal vinyl is soooooo gorgeous. The following includes just a few examples of what you could create with paper and resin: The short answer is yes.
To display your Instagram posts, double-click here to add an account or select an existing connected account. Resin is a highly durable substance that can enhance the look of your artwork whilst providing a great deal of protection. These are the lights used to dry gel nails. What Material, Read More What does Epoxy not stick to? Mix them together for three minutes. Always take care to read the manufacturers directions for the proper mixing ratio and length of time for which the resin and hardener must be mixed together.
While you can cover glossy photo paper with resin, the act of doing so can very often end up smudging the photo ink. Give it a scuff sand with 400 grit sand paper and wipe it clean.
These are beautiful; I've never used resin but this project seems like a great beginner project to start :).
Take your pick the spray or liquid form based on your preferences. The vinyl has a tendency to want to lift up if you dont have a surface thats perfectly smooth. I did the same with the other pink opal design. It was fun and pretty easy. It can be a rabbit hole. Let dry 4 hours. I got my keychain pattern from Creative Fabrica.
Once this layer is cured add the text layer of vinyl then repeat the resin and the lighter process. Remember, you only need a very little bit! Apply 3-4 coats of Brite Tone letting each coat dry for 4 hours. This is a membership site but you can also purchase files without a membership. If you want to seal it two or three times go ahead. Once the front and sides of the front of the paper have been sealed and dried, turn the page over and seal the other side, ensuring that all sides are completely covered. You can cast your paper items in resin to create a beautiful piece of artwork that will not only protect your piece, but will last for a long time as well. Resin paper offers an alternative means of preserving your paper-based art pieces without having to frame them. It will top and not go through if you move it slowly. Except for woodwork, you cannot use the alternatives to epoxy for tumblers for resin crafts like jewelry, keychains, coasters, and more. Always ensure that you take the time to seal your papers properly, leaving no unsealed spots that may get affected by the resin. Moving on to our mug, lets say you want to be able to drink coffee out of this every single morning and you dont really have time to hand wash it all the time. Learn to create fascinating Resin Arts and Crafts within minutes. Your Download limit has been reached - Upgrade to our best value year membership tier today and get ultimate access to our site! For the second and third layers, use a sponge to dab the Mod Podge to prevent the glitters from falling off.
I hope you enjoyed this project. It seemed to take a while but eventually they were no longer tacky. Repeat and sand. Then remove the transfer tape. Add a little resin to the top of the vinyl. If you use them outside, the outdoor weathering can take its toll too. I recently started using the UV resin and it is perfect for these keychains.
Repeat another coat of glitter glue, wait 2 hours, and flatten. The resin and all of the things I can make with it is really starting to grow on me. You will usually require several coats of this sealer type, particularly when working on thicker pieces of paper. Lets start with the wooden tray. Using this spray will improve the contrast of your photographs and artworks. Epoxy resin comes in two liquid parts, being the resin and a hardener. This post may contain affiliate links. I used my weeding tool to get them started. This glue is acid-free, non-toxic, and will not yellow. The opal vinyl is perfect for the background. Why not create your very own Epoxy bar top. I wouldn't have the patience to wait for the epoxy resin to cure. Keychains are a dime a dozenI know but I love to make them. Tanner, Rachel, and Courtney are all here because we love diecutting and especially love sharing fun projects and tutorials with fellow makers. LOL. Place a box over the piece and allow it to cure for the stipulated length of time. They were still tacky so I kept putting them under the light for 30 seconds at a time until they were no longer tacky. If you need more resin just add a little more and keep spreading it over the top. With a simple 1:1 mixing ratio by volume, you will have no trouble using this art resin from ProMarine Supplies! This is my blog about creating fun things including home decor, recycled and up-cycled projects, printables and easy crafts! You may require multiple layers of resin, depending on the project you are doing. until well-covered. CrystaLac method is the most recommended alternative to epoxy. We discussed the steps on how to seal a glitter tumbler without epoxy in the step-by-step instructions above, so check it out. While you can select a resin that is resistant to yellowing, it is important to note that lighter-colored papers can be susceptible to yellowing over time. While it is true that you can wash and use the tumbler applied with CrystaLac after 5 days, it can still change its chemical composition during this time, especially when heat is applied. A light coat of resin will provide a thin, laminate-like piece, whereas a thicker coat will result in a stiffer piece. I even took them outside and put them in the sunshine for a few minutes. The more the better! Spray sealers come in an aerosol can and are sprayed over both sides of the piece of paper. For use on paper, wood, metal, glass, plaster, ceramic, paper mache, etc. Let it dry. A UV-resistant formula means that this crystal-clear resin will not yellow over time. We may earn a small commission from purchases made through them, at no additional cost to you. for the fourth and fifth layers. Meet the Makers Gonna Learn team! Aside from the water-based CrystaLac, Mod Podge and clear acrylic spray do not have a water-resistant finish. To ensure you have no bubbles and can place it properly you can try the wet method: watch this tutorial here.
There a lot to choose from on this site so look around if you want something different.