Elegoo plant-based resin. Step 1: Mixing Epoxy. 5.
Jewelry making ideas Gold leaf resin bracelet tutorialMeasure 30 cc of Part A and 15 cc of Part B into two separate 1-ounce plastic mixing cups . Next, pour both parts into a larger ten-ounce plastic mixing cup . Its important you thoroughly mix the resin.To color the super clear resin, I used Alumilite red dye . Heres where the fun part of my jewelry ideas came into play. More items This tutorial uses the Nunn Design 8 mm round bezel stud or post earrings which are matched with Patera glass cabochons.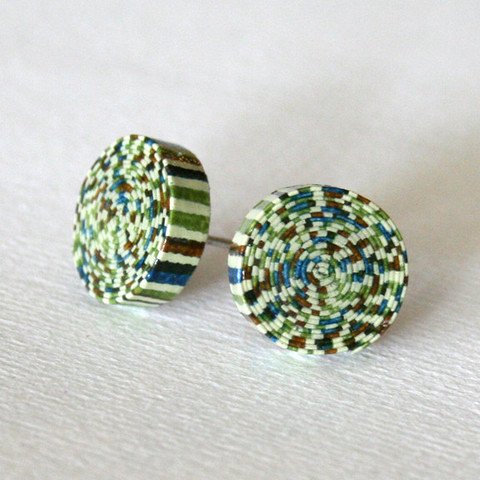 1 The Things You'll Need.
  Overlap the ends by about 18 to 14 inch (0.32 to 0.64 cm) and secure them with a drop of glue. 4.2 Using Eye Pins.
Silicon resin jewelry mold based on what you wish to make (Its important that you use a silicone mold because its flexible, so the resin wont stick to it.) Polymer Clay Woodland Mushroom Earrings.
Pour a layer of resin in. 4.
SUNLU 3D Printer Resin (4-Pack) A great bulk buy. Resin Mold - Paper Weight Cube and Pyramid 2 Piece.
- In this tutorial I add glitter to the mould first rather than mixing it in with the resin.
Resin and Glitter Pendants Jewelry. Also make sure to scrape the resin from around the sides and from the spatula into the cup every once in a while so that its all mixed evenly.
The more you sand, the more the layers of paper will show up. Pour enough of the liquid resin mix into the mold or bezel to completely cover the bottom. Squeezing the silicone cup to control the flow, slowly pour a little resin into the mold. 84 followers . You can even make some fun rings for the little ones to play dress up with. After the first coat is dry, apply a second coat of sealer to the entire surface of the resin. Next, mix both resins in the third cup and mix until combined. Step 8: Use one of your colors and dribble it onto the clear resin in your mold. Leave your resin pendant flat to dry.
 This will help to seal the surface and prevent it of earrings and necklace using your own kimono-inspired, hand painted paper. Discover the versatility of resin and learn how to color, cast, and mold . NOTE: Don't worry if the level of the resin is not flush with the wood. Once thoroughly mixed, throw out the stir stick without scraping off the excess resin. How to Make a Resin Necklace. Sand the edges. Step 5: pour your resin.
Instructions: Put on your gloves and protective goggles and prepare your workspace. This also applies to scrapbook paper. And now you have finished your earrings! The shape and width of the strip ultimately determine the size of the bead, so test different widths to see what suites your project best. Open the jump ring and place through the small opening while also connecting the earring hook to the jump ring. Directions: Prepare all the needed materials.
Read: How To Seal Paper For Resin. Allow this to dry or dry with a hair dryer. Compared to the popular In a third cup, pour the resin hardener followed by the resin and mix for 3-5 minutes. Add Tip. Now make some pearl links thread one pearl bead onto an eye pin, cut off the excess wire and loop the end to secure the bead on the eye pin.
Water Take a paper-wrapped straw and rub the paper up and down a few times to create some static. "Learn to create an exclusive solid and water-resistant Origami jewelry set .
SUNLU 3D Printer Resin (4-Pack) A great bulk buy.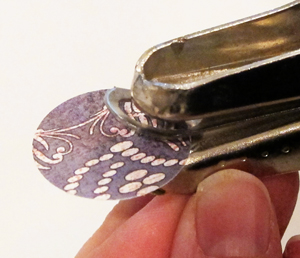 Instructions 1. Take a 3 in (7.6 cm) strip and a 6 in (15 cm) strip of quilling paper. Fairy Pendant Silicone Molds, for UV Resin, Epoxy Resin Jewelry Making, White, 165x88x5mm (SIMO-PW0001-209F) Price/Package: US $10.50 YOUR PRICES Bronze Price: US $10.19
of earrings and necklace using your own kimono-inspired, hand painted paper. 2 Remove any air bubbles. Step 6 Pop the bubbles. 3 Step by Step Instructions. Image credit: Canvas on Youtube. If you want to make jewelry out of paper, fabric, or other porous materials, you need to seal it with a sealant. Steps to make the earrings. Next, mix both resins in the third cup and mix until combined. I quickly found that a glue stick works better and dries faster for this project. Pour the resin into the silicone mold. - Place pendant trays on top of some baking parchment on a very flat tray or plate. Use these battery-powered science experiments to help students explore the magic of batteries after school. Stir continuously for 2 minutes, scraping the sides of the container. Attaching the earring fixings to the resin 5. 3.2 Step Two: Remove the Resin Jewelry from Mold.
Christian Ucke. Avoid agitating too aggressively as this will create bubbles.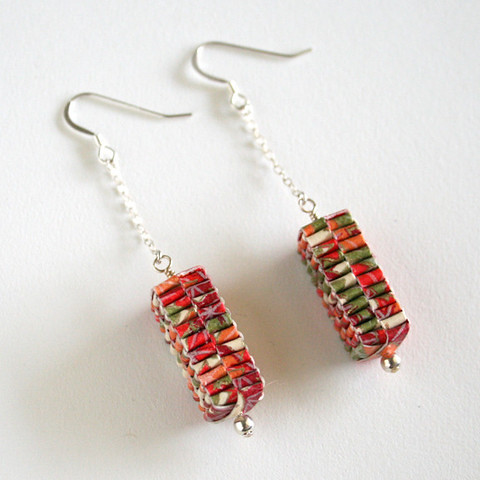 This tutorial is a miniature of the one I did for my previous no resin real flower pendant tutorial.
 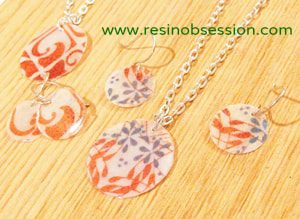 I wanted small studs so I used 8 mm (.30 inches) posts and 10 mm (.40 inches) rings. To start things off, grab a small piece of wood that has a bit of character to it, similar to the one we used. Paperweight Resin Mold - 2 Piece Set. $37 at Amazon.
  Move the piece to a clean area of wax paper. Make or buy a silicone mold. Use the craft stick to help guide the resin into the corners. In this video I demonstrate my unique process on how to create Watercolor Paper Earrings. Before you fill up your bowl, always make sure the smoking pipe is clean.
 Do this for the remaining sets of quilling paper until you have 5 9 in (23 cm) long strips. Add Tip. - Mix resin according to directions. Push a ring into the putty to form a mold. Step 8. If you are planning to add colors or glitters to products, then you have to mix them with resin. Mix the the resin SLOWLY, if you mix it too fast youll get lots of bubbles. Japanese Washi Paper Earrings, Resin Jewelry made with Yuzen Chiyogami, Pink Red and White Cherry Blossom Sakura Flowers, Long Rectangle ad by OokiniCrafts Ad from shop OokiniCrafts OokiniCrafts From shop OokiniCrafts $ 36.50. Consider epoxy resin if youre a beginner. The hole that forms within the role should only be large enough to fit a thick thread through. Add to Favorites Polymer Clay Earrings $ 20.00. Polymer Clay Christmas Cookie Earrings.
Japanese Washi Paper Earrings, Resin Jewelry made with Yuzen Chiyogami, Red Pattern with Gold and Black Accents, Long Rectangle Dangle ad by OokiniCrafts Ad from shop OokiniCrafts OokiniCrafts From shop OokiniCrafts $ 35.50. Step 9: Drizzle the next color to cover more of the clear resin. This helps the resin mix together better and avoid bubbles.
Then, sand its edges with a refiner. This is extremely crucial, and you have to get a 1:1 ratio exactly. $24.95. Sand the layers smooth, rounding the corners down. Pour the epoxy and polyester resin along with the hardener in an equal ratio. 6. If you are a complete beginner in resin art, we recommend using epoxy resin, which is especially suitable for jewelry making. Step 1: Mixing Epoxy. Add in your add-ins.
Add to Favorites Laser Engraved Wood Earrings $ 20.00. Pour a small amount and see the change in color. "The maximum immunity begins about 10 days and beyond following the second dose.
 After the first coat is dry, apply a second coat of sealer to the entire surface of the resin. Step 1: Trace & Cut Strips of Paper. Second, construct a box intended to be used as a molder to be filled with the blue wax. Take the Class. Cure for 1 minute using a UV light. Select a category. Part A and part B chemicals are both needed for making resin jewelry. This will be the base of your pendant. Then in the other plastic cup put the Epoxy Resin Resin and mix both cups separately. Wait at least 48 hours before using resin in the molds. After mixing, add glitter and some of your 2 part resin to a small mixing cup and mix together with a stir stick. 3.1 Step One: Epoxy Resin Casting Jewelry in Silicone Mold.
Add to Favorites Paper and Resin Earrings $ 20.00. Vanishing a Coin With Rings . What is the Best Resin for Jewelry Making?Epoxy Resin. Brands of resin that are labeled "jewelry resin" are typically epoxy resin. Tips for Choosing the Right Epoxy Jewelry Resin. Resin is sold in two parts - resin and hardener (also called catalyst). Polyurethane Casting Resin. Polyester Casting Resin. A Note on Resin Safety. First since Gorilla Glue dries fast you can make cleanup quicker by having paper towels and a clean rag on-hand. After the final layer is set with no bubbles, put it under the UV lamp for around 4-5 minutes.
  Fairy Pendant Silicone Molds, for UV Resin, Epoxy Resin Jewelry Making, White, 165x88x5mm (SIMO-PW0001-209F) Price/Package: US $10.50 YOUR PRICES Bronze Price: US $10.19 Use darker flower petals as the pigment is less likely to fade in the resin over time. After mixing according to the directions, I poured the resin into the medium size square mold which I bought quite a while ago. Use the cocktail stick to drop the resin into the pendant of your resin necklace. One of Fran's tip is to microwave Part A for 5-7 seconds before mixing. 07. Glue the 3 in (7.6 cm) strips to the 6 in (15 cm) strips. Today is Launch Day of Paper Jewelry Making with Origami Techniques.So exciting, plus it is included in the Domestika SUMMER SALE, meaning the course price is currently discounted 83%! Let it set overnight until it cures. Hold a hair dryer, lighter, or heat gun roughly 4 inches (10 cm) above the resin for
Let the ring sit in the mold for 25 minutes before removing it. For a small batch like this I usually mix it for about 3 mins, until the swirls disappear and the resin clears. Some key supplies youll need for working with resin. Step 5.
5. Note: your resin may come with instructions for curing in sunlight. Step 10: After a few minutes use a toothpick to lightly swirl the top. First, put the Epoxy Resin Hardener into one of the plastic measuring cups. By inserting the paper in a premade bezel and covering it with resin, you have created a piece that will last and last. Youll know theyre dry when theyre crispy and paper-like allow two or three weeks minimum. Now get ready for the really fun part! Allow the glue to dry. 000,000 Product(s) Filtering Condition : 2. Add a blob of resin to the center of each earring piece and use a toothpick to spread the resin evenly. The best all-around resin you can buy. The process is based on the same method that I use to create "Watercolor Paper Pend. Step 2: Gather your supplies. Choosing Resin For Jewelry Making.
 4. Pour the mixture into a second cup and stir for an additional minute, scraping the sides of the container and stir stick.
  Sprinkle a bit of glitter around the edges, and if you want, add the charm in the center. Mix your resin according to the package instructions.
  Place the bottles of resin and hardener in a bowl of hot water.
Instructions: Set up your work area and put on your goggles and gloves. Mix a small amount of resin in your mixing cup, according to the directions on your resin packaging. Take equal parts of the two containers (A & B) and mix until it's uniform in color. $37 at Amazon. Festive-themed earrings, such as these gingerbread people, add a sweet touch to the holiday season.
  4.1 Using Glue and Bails. Use tweezers and gently add the piece and push it down. Remove earring from mold. Siraya Tech Fast.
  Gather silver posts and closed silver jump rings (also known as soldered jump rings). Cool You have to be tedious here, because any bubbles left behind will be sure to show and might ruin the look of your earrings. Using a straight edge or ruler trace diagonal lines at consistent widths ( I used 1/2- and 1-inch strips) to create slender triangles. The easy solution is to use paper and glass cabochons! -Pour your resin slowly, otherwise it comes out very thick and fills too much of the mould. Now that your resin is poured into the molds and is ready to go, go in with a fine toothpick and remove any and all bubbles that might be laying below the surface. Mix the resin according to the manufacturers instructions. Be sure to leave open spots for your next color.
  Add flowers, paint, glitter, or similar to the resin. The resin will otherwise seep into and dull the image a bit. Gingerbread people make cute earrings.
Form a ball and start to flatten it slightly.
co. Dextroamphetamine is a synthetic substance related to natural sympathomimetic amines and the synthetic agent amphetamine. Use a cocktail stick to stir gently but thoroughly to mix the hardener in evenly. Work slowly to reduce the number of air bubbles.

The top, bottom, and sides should be painted with several thin coats to allow it to dry completely before applying the next coat. Squeeze a layer of clear resin over the top third of the mold over the layer of glitter. After your resin is mixed, and a small amount of mica powder and glitter to a separate mixing cup. Method 2 Method 2 of 4: Making Hoop Earrings Download Article1. Gather your materials. To make hoop earrings you will need a tube of memory wire, a memory wire cutter (pliers will leave dents in the wire), round nose pliers, 2. Cut one full circle from the memory wire. 3. Curl one edge of the hoop. 4. Thread the beads on. 5. Curl the other edge of the hoop. 78. Attach the French hook earwire. 4 How to Connect.
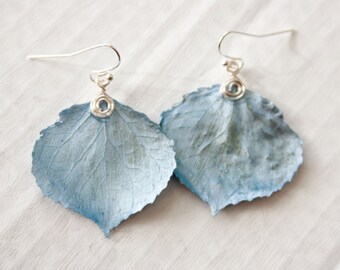
  The beautiful pattern features small white flowers against a dark blue background with golden accents. Punch out at least 12-20 hearts for each earring using your Fiskars heart punch.
Mix exactly equal amounts of Resin and Hardener into one measuring cup. Step 10: Pour the ArtResin into the teardrop mold. Suspend a jewelry fixture in the resin if needed. 3.3 Step Three: Finishing of Epoxy Resin Jewellery. Paper and Resin Earrings $ 10.00. "Learn to create an exclusive solid and water-resistant Origami jewelry set .
Whether its for your own collection or a special DIY gift, these will fit inside a jewelry collection quite nicely. Cut Out & Keep will show you how to make all kinds of glitter resin pendants. Add to Favorites Laser Engraved Peace Sign Earrings $ 20.00.
- Pour resin gently over the image and decide how full you want it to be. 3. Then I used my light to harden the resin. First, put the Epoxy Resin Hardener into one of the plastic measuring cups. 219pcs resin kit for beginners , thrilez resin mold kit with resin molds silicone and epoxy resin supplies include dried flowers, foil flakes, necklace cord, earring hooks for
 Start by applying a thin coat of UV resin, directly from the bottle, at the bottom of your mold. 2 Creating Resin Pendant Charm. Urban Relic by Lisa Blackwell. Step 1: Gather the Supplies Youll Need to Make Resin Jewelry. Pop air bubbles and 2. Step 1. Mix The Epoxy Resin. Trim them and remove any stems before using.
$19 at Amazon. There is no need for mold release as the inside of the mold already has it. IMPORTANT! Pour the mixed resin into a clean cup without scraping the sides of the cup.
Continue adding resin until it is level with the top rim of the pendant. Carefully sand the sides if the edges feel rough or uneven with fine grit sand paper. Add a TINY bit more of resin, so you get a domed effect. Finally, attach your pearl link to the earring hook and you are done! Roll the triangle up tightly, beginning with the edge that was kept straight through the folding step. Owner Katherine Swift was already an experienced resin artist before taking over. Once we got these wood pieces all cut and carved up, we used a little bit of Tyvek tape to create a reservoir on the top of the base. Cure for 2 minutes. Then you have a simple sparkly earring!Pearl or glass beads are an easy option that produces simple, pretty results. To make flower studs, cut out eight circles (each one slightly smaller from the last) from the colored net fabric. The easiest option is just to cover the face of the earring post in some gold, silver or colored glitter glue and wait for it to dry.
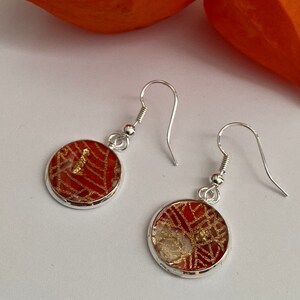
Siraya Tech Fast. Step 2 To measure out the resin in the measuring cups, add the correct ratio of resin to hardener, in this case it is 2:1. Now carefully set down a piece of the paper. This pair of round handmade earrings is made with traditional Japanese Yuzen Washi paper sealed in glossy protective resin. In both cases, the bezels and glass cabochons are from Nunn Design. Use plastic and attach the pieces with hot glue. Today is Launch Day of Paper Jewelry Making with Origami Techniques.So exciting, plus it is included in the Domestika SUMMER SALE, meaning the course price is currently discounted 83%!
It takes about one hour for the white glue to dry enough so that the pendant is ready for sanding. The smaller the bubbles, the more dificult they are to remove. FAQ Silicone Pipe How to clean a Silicone Pipe? Mix the two parts of the resin in the correct ratio. Arrives by Thu, Aug 4 Buy , Resin Durable Earring Hooks, For Jewelry Makers Beginner at Walmart.com $19 at Amazon. This does indeed get rid of more bubbles. I put a small amount of resin on the back and moved the backing around to sort of sink it into the resin.
Then in the other plastic cup put the Epoxy Resin Resin and mix both cups separately.
Step 7.
Make sure the straw piece fits snugly in the metal hex nut you have.
Jewelry making ideas Gold leaf resin bracelet tutorialMeasure 30 cc of Part A and 15 cc of Part B into two separate 1-ounce plastic mixing cups . Next, pour both parts into a larger ten-ounce plastic mixing cup . Its important you thoroughly mix the resin.To color the super clear resin, I used Alumilite red dye . Heres where the fun part of my jewelry ideas came into play. More items This tutorial uses the Nunn Design 8 mm round bezel stud or post earrings which are matched with Patera glass cabochons.
1 The Things You'll Need. Overlap the ends by about 18 to 14 inch (0.32 to 0.64 cm) and secure them with a drop of glue. 4.2 Using Eye Pins. Silicon resin jewelry mold based on what you wish to make (Its important that you use a silicone mold because its flexible, so the resin wont stick to it.) Polymer Clay Woodland Mushroom Earrings.
Pour a layer of resin in. 4.
SUNLU 3D Printer Resin (4-Pack) A great bulk buy. Resin Mold - Paper Weight Cube and Pyramid 2 Piece.
- In this tutorial I add glitter to the mould first rather than mixing it in with the resin.
Resin and Glitter Pendants Jewelry. Also make sure to scrape the resin from around the sides and from the spatula into the cup every once in a while so that its all mixed evenly.
The more you sand, the more the layers of paper will show up.
Pour enough of the liquid resin mix into the mold or bezel to completely cover the bottom. Squeezing the silicone cup to control the flow, slowly pour a little resin into the mold. 84 followers . You can even make some fun rings for the little ones to play dress up with. After the first coat is dry, apply a second coat of sealer to the entire surface of the resin. Next, mix both resins in the third cup and mix until combined. Step 8: Use one of your colors and dribble it onto the clear resin in your mold. Leave your resin pendant flat to dry. This will help to seal the surface and prevent it of earrings and necklace using your own kimono-inspired, hand painted paper. Discover the versatility of resin and learn how to color, cast, and mold . NOTE: Don't worry if the level of the resin is not flush with the wood. Once thoroughly mixed, throw out the stir stick without scraping off the excess resin. How to Make a Resin Necklace. Sand the edges. Step 5: pour your resin. Instructions: Put on your gloves and protective goggles and prepare your workspace. This also applies to scrapbook paper.
And now you have finished your earrings! The shape and width of the strip ultimately determine the size of the bead, so test different widths to see what suites your project best. Open the jump ring and place through the small opening while also connecting the earring hook to the jump ring. Directions: Prepare all the needed materials. Read: How To Seal Paper For Resin. Allow this to dry or dry with a hair dryer. Compared to the popular In a third cup, pour the resin hardener followed by the resin and mix for 3-5 minutes. Add Tip. Now make some pearl links thread one pearl bead onto an eye pin, cut off the excess wire and loop the end to secure the bead on the eye pin.
Water Take a paper-wrapped straw and rub the paper up and down a few times to create some static. "Learn to create an exclusive solid and water-resistant Origami jewelry set .
SUNLU 3D Printer Resin (4-Pack) A great bulk buy.
Instructions 1. Take a 3 in (7.6 cm) strip and a 6 in (15 cm) strip of quilling paper. Fairy Pendant Silicone Molds, for UV Resin, Epoxy Resin Jewelry Making, White, 165x88x5mm (SIMO-PW0001-209F) Price/Package: US $10.50 YOUR PRICES Bronze Price: US $10.19 of earrings and necklace using your own kimono-inspired, hand painted paper. 2 Remove any air bubbles. Step 6 Pop the bubbles. 3 Step by Step Instructions. Image credit: Canvas on Youtube. If you want to make jewelry out of paper, fabric, or other porous materials, you need to seal it with a sealant. Steps to make the earrings. Next, mix both resins in the third cup and mix until combined. I quickly found that a glue stick works better and dries faster for this project. Pour the resin into the silicone mold. - Place pendant trays on top of some baking parchment on a very flat tray or plate. Use these battery-powered science experiments to help students explore the magic of batteries after school. Stir continuously for 2 minutes, scraping the sides of the container. Attaching the earring fixings to the resin 5. 3.2 Step Two: Remove the Resin Jewelry from Mold.
Christian Ucke. Avoid agitating too aggressively as this will create bubbles.
This tutorial is a miniature of the one I did for my previous no resin real flower pendant tutorial. I wanted small studs so I used 8 mm (.30 inches) posts and 10 mm (.40 inches) rings. To start things off, grab a small piece of wood that has a bit of character to it, similar to the one we used. Paperweight Resin Mold - 2 Piece Set. $37 at Amazon. Move the piece to a clean area of wax paper. Make or buy a silicone mold. Use the craft stick to help guide the resin into the corners. In this video I demonstrate my unique process on how to create Watercolor Paper Earrings. Before you fill up your bowl, always make sure the smoking pipe is clean. Do this for the remaining sets of quilling paper until you have 5 9 in (23 cm) long strips. Add Tip. - Mix resin according to directions. Push a ring into the putty to form a mold. Step 8. If you are planning to add colors or glitters to products, then you have to mix them with resin. Mix the the resin SLOWLY, if you mix it too fast youll get lots of bubbles. Japanese Washi Paper Earrings, Resin Jewelry made with Yuzen Chiyogami, Pink Red and White Cherry Blossom Sakura Flowers, Long Rectangle ad by OokiniCrafts Ad from shop OokiniCrafts OokiniCrafts From shop OokiniCrafts $ 36.50. Consider epoxy resin if youre a beginner. The hole that forms within the role should only be large enough to fit a thick thread through. Add to Favorites Polymer Clay Earrings $ 20.00. Polymer Clay Christmas Cookie Earrings. Japanese Washi Paper Earrings, Resin Jewelry made with Yuzen Chiyogami, Red Pattern with Gold and Black Accents, Long Rectangle Dangle ad by OokiniCrafts Ad from shop OokiniCrafts OokiniCrafts From shop OokiniCrafts $ 35.50. Step 9: Drizzle the next color to cover more of the clear resin. This helps the resin mix together better and avoid bubbles.
Then, sand its edges with a refiner. This is extremely crucial, and you have to get a 1:1 ratio exactly. $24.95. Sand the layers smooth, rounding the corners down. Pour the epoxy and polyester resin along with the hardener in an equal ratio. 6. If you are a complete beginner in resin art, we recommend using epoxy resin, which is especially suitable for jewelry making. Step 1: Mixing Epoxy. Add in your add-ins.
Add to Favorites Laser Engraved Wood Earrings $ 20.00. Pour a small amount and see the change in color. "The maximum immunity begins about 10 days and beyond following the second dose.
After the first coat is dry, apply a second coat of sealer to the entire surface of the resin. Step 1: Trace & Cut Strips of Paper. Second, construct a box intended to be used as a molder to be filled with the blue wax. Take the Class. Cure for 1 minute using a UV light. Select a category. Part A and part B chemicals are both needed for making resin jewelry. This will be the base of your pendant. Then in the other plastic cup put the Epoxy Resin Resin and mix both cups separately. Wait at least 48 hours before using resin in the molds. After mixing, add glitter and some of your 2 part resin to a small mixing cup and mix together with a stir stick. 3.1 Step One: Epoxy Resin Casting Jewelry in Silicone Mold. Add to Favorites Paper and Resin Earrings $ 20.00. Vanishing a Coin With Rings . What is the Best Resin for Jewelry Making?Epoxy Resin. Brands of resin that are labeled "jewelry resin" are typically epoxy resin. Tips for Choosing the Right Epoxy Jewelry Resin. Resin is sold in two parts - resin and hardener (also called catalyst). Polyurethane Casting Resin. Polyester Casting Resin. A Note on Resin Safety.
First since Gorilla Glue dries fast you can make cleanup quicker by having paper towels and a clean rag on-hand. After the final layer is set with no bubbles, put it under the UV lamp for around 4-5 minutes. Fairy Pendant Silicone Molds, for UV Resin, Epoxy Resin Jewelry Making, White, 165x88x5mm (SIMO-PW0001-209F) Price/Package: US $10.50 YOUR PRICES Bronze Price: US $10.19 Use darker flower petals as the pigment is less likely to fade in the resin over time. After mixing according to the directions, I poured the resin into the medium size square mold which I bought quite a while ago. Use the cocktail stick to drop the resin into the pendant of your resin necklace. One of Fran's tip is to microwave Part A for 5-7 seconds before mixing. 07. Glue the 3 in (7.6 cm) strips to the 6 in (15 cm) strips. Today is Launch Day of Paper Jewelry Making with Origami Techniques.So exciting, plus it is included in the Domestika SUMMER SALE, meaning the course price is currently discounted 83%! Let it set overnight until it cures. Hold a hair dryer, lighter, or heat gun roughly 4 inches (10 cm) above the resin for Let the ring sit in the mold for 25 minutes before removing it. For a small batch like this I usually mix it for about 3 mins, until the swirls disappear and the resin clears. Some key supplies youll need for working with resin.
Step 5. 5. Note: your resin may come with instructions for curing in sunlight. Step 10: After a few minutes use a toothpick to lightly swirl the top. First, put the Epoxy Resin Hardener into one of the plastic measuring cups. By inserting the paper in a premade bezel and covering it with resin, you have created a piece that will last and last. Youll know theyre dry when theyre crispy and paper-like allow two or three weeks minimum. Now get ready for the really fun part! Allow the glue to dry. 000,000 Product(s) Filtering Condition : 2. Add a blob of resin to the center of each earring piece and use a toothpick to spread the resin evenly. The best all-around resin you can buy. The process is based on the same method that I use to create "Watercolor Paper Pend. Step 2: Gather your supplies. Choosing Resin For Jewelry Making.
4. Pour the mixture into a second cup and stir for an additional minute, scraping the sides of the container and stir stick. Sprinkle a bit of glitter around the edges, and if you want, add the charm in the center. Mix your resin according to the package instructions. Place the bottles of resin and hardener in a bowl of hot water. Instructions: Set up your work area and put on your goggles and gloves. Mix a small amount of resin in your mixing cup, according to the directions on your resin packaging. Take equal parts of the two containers (A & B) and mix until it's uniform in color. $37 at Amazon.
Festive-themed earrings, such as these gingerbread people, add a sweet touch to the holiday season. 4.1 Using Glue and Bails. Use tweezers and gently add the piece and push it down. Remove earring from mold. Siraya Tech Fast. Gather silver posts and closed silver jump rings (also known as soldered jump rings). Cool You have to be tedious here, because any bubbles left behind will be sure to show and might ruin the look of your earrings. Using a straight edge or ruler trace diagonal lines at consistent widths ( I used 1/2- and 1-inch strips) to create slender triangles. The easy solution is to use paper and glass cabochons! -Pour your resin slowly, otherwise it comes out very thick and fills too much of the mould. Now that your resin is poured into the molds and is ready to go, go in with a fine toothpick and remove any and all bubbles that might be laying below the surface. Mix the resin according to the manufacturers instructions. Be sure to leave open spots for your next color. Add flowers, paint, glitter, or similar to the resin. The resin will otherwise seep into and dull the image a bit. Gingerbread people make cute earrings. Form a ball and start to flatten it slightly.
co. Dextroamphetamine is a synthetic substance related to natural sympathomimetic amines and the synthetic agent amphetamine. Use a cocktail stick to stir gently but thoroughly to mix the hardener in evenly. Work slowly to reduce the number of air bubbles.
The top, bottom, and sides should be painted with several thin coats to allow it to dry completely before applying the next coat. Squeeze a layer of clear resin over the top third of the mold over the layer of glitter.
After your resin is mixed, and a small amount of mica powder and glitter to a separate mixing cup. Method 2 Method 2 of 4: Making Hoop Earrings Download Article1. Gather your materials. To make hoop earrings you will need a tube of memory wire, a memory wire cutter (pliers will leave dents in the wire), round nose pliers, 2. Cut one full circle from the memory wire. 3. Curl one edge of the hoop. 4. Thread the beads on. 5. Curl the other edge of the hoop. 78. Attach the French hook earwire. 4 How to Connect. The beautiful pattern features small white flowers against a dark blue background with golden accents. Punch out at least 12-20 hearts for each earring using your Fiskars heart punch. Mix exactly equal amounts of Resin and Hardener into one measuring cup. Step 10: Pour the ArtResin into the teardrop mold. Suspend a jewelry fixture in the resin if needed. 3.3 Step Three: Finishing of Epoxy Resin Jewellery. Paper and Resin Earrings $ 10.00. "Learn to create an exclusive solid and water-resistant Origami jewelry set .
Whether its for your own collection or a special DIY gift, these will fit inside a jewelry collection quite nicely. Cut Out & Keep will show you how to make all kinds of glitter resin pendants. Add to Favorites Laser Engraved Peace Sign Earrings $ 20.00.
- Pour resin gently over the image and decide how full you want it to be. 3.
Then I used my light to harden the resin. First, put the Epoxy Resin Hardener into one of the plastic measuring cups. 219pcs resin kit for beginners , thrilez resin mold kit with resin molds silicone and epoxy resin supplies include dried flowers, foil flakes, necklace cord, earring hooks for Start by applying a thin coat of UV resin, directly from the bottle, at the bottom of your mold. 2 Creating Resin Pendant Charm. Urban Relic by Lisa Blackwell. Step 1: Gather the Supplies Youll Need to Make Resin Jewelry. Pop air bubbles and 2. Step 1. Mix The Epoxy Resin. Trim them and remove any stems before using. $19 at Amazon.
There is no need for mold release as the inside of the mold already has it. IMPORTANT! Pour the mixed resin into a clean cup without scraping the sides of the cup. Continue adding resin until it is level with the top rim of the pendant. Carefully sand the sides if the edges feel rough or uneven with fine grit sand paper. Add a TINY bit more of resin, so you get a domed effect. Finally, attach your pearl link to the earring hook and you are done! Roll the triangle up tightly, beginning with the edge that was kept straight through the folding step. Owner Katherine Swift was already an experienced resin artist before taking over. Once we got these wood pieces all cut and carved up, we used a little bit of Tyvek tape to create a reservoir on the top of the base. Cure for 2 minutes. Then you have a simple sparkly earring!Pearl or glass beads are an easy option that produces simple, pretty results. To make flower studs, cut out eight circles (each one slightly smaller from the last) from the colored net fabric. The easiest option is just to cover the face of the earring post in some gold, silver or colored glitter glue and wait for it to dry.
Siraya Tech Fast.
Step 2 To measure out the resin in the measuring cups, add the correct ratio of resin to hardener, in this case it is 2:1. Now carefully set down a piece of the paper. This pair of round handmade earrings is made with traditional Japanese Yuzen Washi paper sealed in glossy protective resin. In both cases, the bezels and glass cabochons are from Nunn Design. Use plastic and attach the pieces with hot glue. Today is Launch Day of Paper Jewelry Making with Origami Techniques.So exciting, plus it is included in the Domestika SUMMER SALE, meaning the course price is currently discounted 83%! It takes about one hour for the white glue to dry enough so that the pendant is ready for sanding. The smaller the bubbles, the more dificult they are to remove. FAQ Silicone Pipe How to clean a Silicone Pipe? Mix the two parts of the resin in the correct ratio. Arrives by Thu, Aug 4 Buy , Resin Durable Earring Hooks, For Jewelry Makers Beginner at Walmart.com $19 at Amazon. This does indeed get rid of more bubbles. I put a small amount of resin on the back and moved the backing around to sort of sink it into the resin.
Then in the other plastic cup put the Epoxy Resin Resin and mix both cups separately.
Step 7.
Make sure the straw piece fits snugly in the metal hex nut you have.