As a final step close the bottom cap of level controller after neatly placing all the, CS Water Tech dealing with all most all Water Level Controller Manufacturers and Best Service Providers in Bangalore. Now the pump should start pumping. Connect the brown sensing wire to the flow sensor cable (DO not put insulation tape for this joint. The starter will have voltage and current meters with ON and OFF Push Buttons on the Door of the Panel. 7. All of our products, whether level controllers or liquid level sensors, are made in our US-based facility, where we monitor every step of the manufacturing process. As far as removing the sensors, there is a great You Tube video showing removal using a box end wrench with an oversize washer and using a nut to pull the sensor out. Lebanon KOA Holiday on Salmon Falls River, Find Great Campgrounds in the Land of 10,000 Lakes, 10 Best Bozeman RV Parks & Campgrounds, Affordable RVing Solutions That Can Save You Money, Content on SunlineClub.com is copyrighted and may not be reproduced without written permission. A separate Water Tank Sensor Kit is required for each tank. Do complete sensing wiring from Water Level Controller to Overhead Tank and Water Level Controller to Underground Sump / Well. GEMS has no responsibility for any external web site. The water level sensor of your water holding tank is an essential component.
STEP 6. This power supply can use either 110VAC or 220VAC (both available for the same price just let us know which one you need). Remove the wire from any one of the OFF button terminal and join it with one of the OFF BUTTON SERIES CON. terminal and insulate it with insulation tape thoroughly. Immerse all three UG sump sensing probes inside the UG sump water. Do the 4 pair CAT 5e sensing wire cabling from the level controller to underground sump and leave 1.5 to 2 meter extra cable near underground sump.
STEP 6a. The Water Tank Sensor combined with the TVMS can report five states: empty, one-quarter, one-half, three-quarters, and full. Non contact level sensors are smaller by design which reduces shipping cost and transit time compared to large stem and float-based sensors.
Isolate the Main Power Supply before the Power Connection Procedure and open the door of the Starter. Keep the OH Tank ON and OFF sensors above the water, now the pump will, STEP 2. Our water tank level control system uses well level sensors to manage and control water level in your water tank.
You can eliminate the use of electronic float switches for water storage tanks with water tank level sensors, the best float system for a water tank, orwell water holding tank. STEP 6. STEP 7. Unlike many of our competitors, our well water holding tank sensors are designed for use in water, resulting in little or no need for calibration during the install. We designed the sensor head to go into the top of the tank or mount along side the tank in an external static pipe. There is a lot of info. Before you cut the sensor wire make sure what sensor wire lights what light to insure you have enough wire by touching it to the ground wire. We sell many different types of level control systems and sensors. Please add some widgets by going to Admin > Appearance > Widgets and add widgets in "Right Sidebar for Pages" area. At Waterline Controls, we are confident youll find our products safe and easy to install yourself. There we monitor every step of the manufacturing process. STEP 1. Universal Level Sensor technology encapsulates the best of what existing sensor types offer in a single sensor technology. *Excludes ARB fridges and fridge bundles, (Low fixed freight for AK, HI, Canada & Mexico - all orders shipped from North Carolina). Power ON LED should glow. Sleeve the outer grey sleeve of the sensing wire unto the height of the PVC pipe. Now slowly dip the Pump OFF sensor inside the water, now the Pump should remain OFF. Take an electrical PVC pipe of 3/4th inch or 1 inch which is commonly available. In OH Tank, lift slowly both Pump ON sensor and Pump OFF sensor above water level. Now the power connection is completed.
  The sensor head has five foot long stainless-steel probes to accurately detect when the water is at various levels. Sensing Connection includes the cabling of sensing wire, i.e.,6Pair CAT 5e from the Water Level Controller to the Overhead Tank (OH Tank). %PDF-1.2 Our sensor rods will not foul, plate or deteriorate no matter the water quality and the system comes with a 100% Satisfaction Guarantee. This will bypass the Flow sensing function ensuring proper functionality of remaining features of automation excluding dry-run protection. Set the level of Pump OFF sensor (yellow wire) at the bottom of the Sump at about 4 to 5 inches above Foot Valve level in the Sump. We offer products comparable to the products offered by the above companies. Insulation Tape, necessary screws and wooden gattas pieces for mounting controller.
STEP 1. STEP 8. Connect those wires to the four terminals of ON button (i.e. STEP 8. After cabling, making the level sensing arrangement in the water tanks and Sensing connection of the sensing cable to the Water Level Controller. Wiring issue, 1985 T1950, wiring diagram available? The power supply can go into a new or existing electrical panel that has the well pump relay (110VAC coil) and the booster pump relay (110VAC Coil).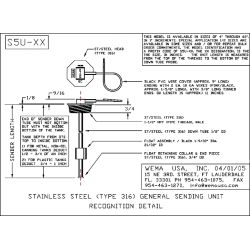 At Waterline Controls, we are confident youll find our products safe and easy to install yourself. Sensing Cable Connection to Water Level Controller. Non contact design eliminates the requirement of material compatibility between the liquid and the sensor, especially on corrosive Deionized Water and Reverse Osmosis water. The Water Level Controller system will have four Nos. Isolate the Main Power Supply before the Power Connection Procedure and. For you and your family, the safe and accurate control of the holding tank water level makes the difference between having drinking water for your home and not having it. STEP 9. They are mentioned for comparison purposes only. Now the power connection is completed.
  STEP 5. Our level sensors and controls arent just for use in residential potable water holding tanks; some models are suitedcooling towers, boilers andbuilding fire protection water tanks. To test the flow sensor, remove the joint of flow sensor to brown wire, keep the brown wire outside water and lift both ON and OFF sensor probes from the water to switch. Holding tanks can vary greatly in size, from small ones that hold about 2,500 gallons to large ones that hold 144,000 gallons. Identify four terminals of starter ON Button (i.e. STEP 4. Monitor Panel M21VW, https://www.garnetinstruments.com/rv-shop/, https://www.rvupgradestore.com/RV-Tastem-s/164.htm, Help! As the source of water is Bore well, the sump sensing function have to be bypassed in the controller itself.
STEP 1. The Power Connection is the connection between the Water Level Controller and your existing Starter with which you are presently operating the Pumpset. TVMSDBWK-002 contains only the Wiring Loom. It remains in focus throughout the design and manufacturing process. STEP 6b. All of our liquid level controls and liquid level sensors are assembled right here in the U.S.A. where we monitor every step of the process. Multi strand 1.5 Sq.mm. Set the level of Common sensor (red wire) at the bottom of the Sump. Put a layer of insulation tape on top of terminal blocks to avoid any contact of sensing cables with power terminal block. NOT SURE WHAT YOU NEED? Put the Auto/Manual Switch of Level Controller to Manual Mode and them switch ON the Power. Recorre nuestra galera de productos.Cuando encuentres un producto de tu preferenciaclickea en "Aadir"! Identify Phase & Neutral wire in the Starter with LINE TESTER after switching ON the power supply. Unit will not operate correctly in these cases. Email: cswatertechnologies@gmail.com, Inbuilt Timer For Low Source Borewell Pump, Installation Procedure for Water Level Controller. Now OH Tank testing is completed.
Also make sure that Flow sensor does not touch the Delivery pipe. Non contact level sensors small design also reduces installation time and the amount of personnel needed to install.
Again slowly dip the Pump ON sensor also inside the water, now the Pump should. Up to six tanks can be monitored through the TVMS. Connect the removed motor wires to Output Terminal PHASE O/P and NUTRL O/P of Water Level Controller To give the Sensing connection in the underground sump, initially decide the levels at which the pump has to switch ON and switch OFF. If you do have questions, were available at888-905-1892to walk you through the installation process. Cut the pipe about 12 inches less than the height of the sump so that pipe can be hanged vertically inside the sump. STEP 4. Do the 6 pair CAT 5e sensing wire cabling from the level controller to overhead tank and leave 1.5 to 2 meter extra cable near overhead tank. Important: The Sensing wire from the unit to OH Tank and unit to UG Sump / Well should be a one-piece wire and there should be absolutely no joints in these Sensing wires and these wires should not be damaged in any way. This can be done by immersing and lifting of the sensor arrangement in the OH Tank water. After it exits the bottom of the trailer, my wires run along the propane line. The Single Phase Borewells will usually have a starter with start capacitors and run capacitors inside. Take precautions to see that the joint will not get inside the water when tank is full. (Not applicable for Bore well Pump sets.). STEP 5. The sensing arrangement should be away from the wall of the tank and also should be away from the water falling into the tank. Attached is a pic JohnB sent me of his wiring diagram for the control panel. As usual procedure, ON Level can be 30% of tank capacity and OFF Level can be 4 to 5 inches above the Foot valve of the suction pipe of Pump set. To Control such starters the control wiring will be done only to the ON and OFF Push Buttons. STEP 3. STEP 10. Power Connection from the (220V AC) Single Phase Starter to the Water Level Controller.
Water is drawn into the hold tanking via a motorized pump placed in the well. Now immerse Pump OFF sensor also inside the water, now pump should switch OFF immediately. A well water holding tank is a large storage tank that holds water drawn from a well. Identify the Power Terminal Block with sticker of connection details in Water Level Controller. TVMSDBWK-001 includes all parts. If you dont see a model that works for you, we can create acustom control. This is an independent, unofficial site. Also, the liquid level sensors we use are low-voltage and low-ampere, greatly reducing the chance of injury due to electrical shock during installation or maintenance. Don't expect miracles they are notoriously inaccurate. Waterline Controls, with over 25 years of experience, makes the products you and your family can count on and provides a5 Year Limited Warrantywith all of its units.
When that happens, malfunctions occur. if you want a particular brand Cost of Water Level Controller please Call:8095379069, 8123795696, 162, 5th Cross, Brindhavan Layout TC Palya Bangalore 560 036 India Make the loop of the sensing wire, to hang the sensing arrangement to the top portion of the sump with the help of a hook or nail. It can be insulated after testing of the system, as explained later).
Again slowly lift the Pump OFF sensor also, above the water, now pump should get switched OFF immediately. Connect Phase and Neutral from the starter to the Power Input Terminals PHASE I/P and NUTRL I/P. To give the Sensing connection in the Overhead Tank, initially decide the levels at which the pump has to switch ON and switch OFF. Cut the pipe about 2 inch less than the height of the tank so that pipe can be hanged vertically inside the tank. Quality isnt an afterthought with Waterline Controls. The web site you have selected is an external one located on another server. pump should remain ON. Don't forget, you may need these parts to go with this: The Water Tank Sensor Kit allows the RedVision Total Vehicle Management System (TVMS) distribution box to measure the water level in an RV/motor home clean water tank. To bypass the sump sensing function, Yellow wire, Black wire, Green wire and Red wire have to be just shorted and insulated with Insulation tape. CuttingPliersorNosePliers. STEP 2. Fix the Flow sensor to the mouth of the Delivery Pipe in the overhead tank with cable tie or insulation tape, in such a way that the pumped water will flow through that sensor. Connect back the brown wire to flow sensor and now insulate it with the insulation tape. Your system comes with a color-coded wiring diagram: the sensor head colors are matched to the same colored wires power supply. The liquid level sensors we use are low-voltage and low-ampere, and greatly reduce the chance of injury due to electrical shock during installation or maintenance. STEP 6.
Thank you for visiting GEMS Sensors & Controls web site. For ON Button connection, connect four wires, i.e., two wires for ON BUTTON-A PARALLEL CON. terminals and two wires for ON BUTTON-B PARALLEL CON. terminals of 4 way terminal block of Level Controller. The tradenames and trademarks in this page are owned by their respective companies or are the same name as the company. It neither endorses the information, content, presentation, or accuracy, nor makes any warranty, express or implied, regarding any external site. The relays need 110VAC coils so they can be wired into the Waterline Controls Power supply (PS2) that is provided with this set-up. STEP 4.
Copper Power cable of about 2 to 6 meters as per requirement. Then start testing the OH Tank function. Remove the bottom cap of the Water Level Controller and identify the coloured sensing wire bunches on the bottom opening of the Unit. STEP 10. The Water Tank Sensor Kit allows the RedVision Total Vehicle Management System (TVMS) distribution box to measure the water level in an RV/motor home clean water tank. STEP 3. If you do have questions, were available at 888-905-1892 to walk you through the installation process. One ground wire to all, one sensor wire to each sensor. The advantage of having loose sensing wire over the sensing terminal block is that, loose contacts are avoided and testing of the controller functions can be done easily by shorting the sensing wires of controller directly. Repeat the steps from STEP 4 to STEP 7 for four to five times to ensure the correct operations. For more information, refer to the RedVision Instruction Manual. Thanks john, I may do that upgrade. Now lift only Pump OFF sensor from the water, Pump should remain OFF.
I believe the colors are somewhat standard as to their purpose. STEP 3. All of our liquid level controls and liquid level sensors are assembled right here in the U.S.A. All of our products, whether level controllers or liquid level sensors, are made in our US-based facility. STEP 5. Now also lift Pump ON sensor from the water, now Pump should switch ON again. This will introduce a 15 second delay for all ON operation. STEP 7.
Save a service fee for a water level switch installation.
Now short the two delay wires and insert it inside the sleeve firmly. DX-WLC Model Level Controller for (220V AC) Single Phase Pumpset /Starter. In fact, many of our first models, developed in the 1980s, are still in use today. STEP 9. Identify the Power Terminal Block with sticker of connection details in Water Level, Controller. Thats why a reliable sensor that requires minimal maintenance is so important. Some models are suited to applications such ascooling towers, boilers andbuilding fire protection water tanks. SUPPORT WARRANTY CONTACT US PACKAGE OPTIONS RESOURCES. Sign up for the REDARC newsletter to stay up to date with the tips, technical information and product releases. And all of this can be caused by sub-par sensors. We can accommodate businesses and properties with dozens or even hundreds of apartments or condominiums. Operate the ON and OFF button of the starter to Confirm that the motor is working in Manual Mode. In-vehicle Dual Battery Chargers & Isolators, Electric Trailer Brake Controller Vehicle Selector, RedVision Total Vehicle Management System. STEP 2. There are some good you tube videos showing these.
Put the Auto/Manual Switch of Level Controller to Manual Mode, switch ON the, Mains to Confirm that the motor in working in Manual Mode.
2021 Gems Sensors, Inc. All rights reserved. of 2 way terminal blocks for power terminations mounted as shown in the Photo for the Bore well Motor. I checked continuity from the 22 gauge (small wires) at the control panel, to the 18 gauge (big wires) under the trailer frame. Vinos: http://www.lolamorawine.com.ar/vinos.html, Regalos Empresariales: http://www.lolamorawine.com.ar/regalos-empresariales.html, Delicatesen: http://www.lolamorawine.com.ar/delicatesen.html, Finca "El Dtil": http://www.lolamorawine.com.ar/finca.html, Historia de "Lola Mora": http://www.lolamorawine.com.ar/historia.html, Galera de Fotos: http://www.lolamorawine.com.ar/seccion-galerias.html, Sitiorealizado por estrategics.com(C) 2009, http://www.lolamorawine.com.ar/vinos.html, http://www.lolamorawine.com.ar/regalos-empresariales.html, http://www.lolamorawine.com.ar/delicatesen.html, http://www.lolamorawine.com.ar/finca.html, http://www.lolamorawine.com.ar/historia.html, http://www.lolamorawine.com.ar/seccion-galerias.html. Too little water means inadequate water pressure and potential dry running of equipment both of which leads to expensive repairs to holding tanks and associated equipment. I found the wiring conduit near the tank senator's control panel. Power Connection from the (220V AC) Single Phase Starter / MCB / DP Switch to the Water Level Controller. One length of 3/4th or 1 inch dia. Waterline Controls 8350 E Evans Road Ste C3 Scottsdale, AZ 85260, FREE: 1-888-905-1892 LOCAL: 1-480-905-1892 EMAIL: info@waterlinecontrols.com. STEP 5. STEP 5. STEP 6. Connect in parallel) without disturbing existing starter wires. STEP 5. The kit includes cable, sensor probes and crimp lugs. STEP 3. Keep the delay wires (thin wires) open before testing procedure. Like always John, you're a wealth of good information, and knowledge!! STEP 2. STEP 2. Gems RLI-80 Non Contact Radar Water Level Tank Sensor, Learn more about the ULS-100 Water Tank Level Sensor >. Another OFF BUTTON SERIES CON. terminal of the Level Controller has to be connected to stop button terminal from where wire was removed in step 6a. Repeat the steps from STEP 2 to STEP 5 for four to five times to ensure the correct operations. We don't find any widget to show. Sleeve the outer grey sleeve of the sensing wire unto the height of the PVC pipe. STEP 6. STEP 4. STEP 4. Made it look very easy. Continuity of wire should be checked before wire is laid. STEP 7. 6. >$0Jw~_6XN/;N'{S(6BwD+K6l/` nBe9:6LpAi{_/poii=7BnU 5b3v. Most water tanks use a water tank mechanical float switch to help clear sewage and water applications but these switches are too unreliable and usually dont last more than 3 years. Monitor Manual, Sunline Coach Owner's Club - Sunline Owner's Files - K.I.B. STEP 11. The Water Tank Sensor Kit includes all parts needed to accurately measure the clean water levels in an RV/motorhome. Now put the Auto/Manual Switch of Level Controller to Auto Mode. Sleeve wires for about 3 to 4 inch, twist the sleeved wire around the sensors provided and crimp the sensors to the end of those wires Now fix the sensors at different levels of the pipe as per the levels decided, with insulation tape in the following order: . If they are not repaired or replaced, they will fail entirely. Set the level of Pump ON sensor (black wire) approximately at One Foot above the Sump medium sensor in the Sump. Too many times, the traditional well water holding tank sensors are sub-par. Suspend both UG sump and OH tank sensing arrangements in proper position and tie it to ensure the same. STEP 4.
See our website pages for further information on the products. Slide the black PVC sleeve provided over the twisted joint completely. Looks like you only need to splice in a red and brown wire under the camper to whatever they go to. Waterline Controls is a registered trademark of System Dynamics, Inc. Click on the link below to complete the form on the next page and we will provide specifications and pricing on the right unit to meet your need. The cable plugs directly into the TVMS and includes sensor probes to be fitted to the water tank and crimp lugs to connect the cable to the probes. Non contact design also ensures there are no issues with hard water leaving mineral deposits on float-based sensors, causing them to fail. STEP 3. usually a Green Push switches mounted on the door of the starter. Commercial potable water systems and industrial applications involving livestock or industrial processing also use well tankers. STEP 4. ), STEP 1. STEP 1. FREE SHIPPING on orders over $99 in Contiguous US. Mysterious Water in my Fresh Water Holding Tank. Now switch OFF the Mains and remove the output terminals of the starter or DP, switch, i.e. If you are ready to replace your water well tank float switch with a reliable, economical, minimal maintenance alternative, you can buy one here today orgive us a callif you have any questions. Regardless of its application, though, it is crucial to know how much water is in the holding tank to ensure that the well and pump are being used efficiently. In UG sump, slowly lift the Pump ON sensor (topmost sensor) above the water, the. Wiring at the control panel appears correct. All the connections between the power supply and the sensor are color matched to make the installation easy and fast.
STEP 6. This power supply can use either 110VAC or 220VAC (both available for the same price just let us know which one you need). Remove the wire from any one of the OFF button terminal and join it with one of the OFF BUTTON SERIES CON. terminal and insulate it with insulation tape thoroughly. Immerse all three UG sump sensing probes inside the UG sump water. Do the 4 pair CAT 5e sensing wire cabling from the level controller to underground sump and leave 1.5 to 2 meter extra cable near underground sump.
STEP 6a. The Water Tank Sensor combined with the TVMS can report five states: empty, one-quarter, one-half, three-quarters, and full. Non contact level sensors are smaller by design which reduces shipping cost and transit time compared to large stem and float-based sensors.
Isolate the Main Power Supply before the Power Connection Procedure and open the door of the Starter. Keep the OH Tank ON and OFF sensors above the water, now the pump will, STEP 2. Our water tank level control system uses well level sensors to manage and control water level in your water tank.
You can eliminate the use of electronic float switches for water storage tanks with water tank level sensors, the best float system for a water tank, orwell water holding tank. STEP 6. STEP 7. Unlike many of our competitors, our well water holding tank sensors are designed for use in water, resulting in little or no need for calibration during the install. We designed the sensor head to go into the top of the tank or mount along side the tank in an external static pipe. There is a lot of info. Before you cut the sensor wire make sure what sensor wire lights what light to insure you have enough wire by touching it to the ground wire. We sell many different types of level control systems and sensors. Please add some widgets by going to Admin > Appearance > Widgets and add widgets in "Right Sidebar for Pages" area. At Waterline Controls, we are confident youll find our products safe and easy to install yourself. There we monitor every step of the manufacturing process. STEP 1. Universal Level Sensor technology encapsulates the best of what existing sensor types offer in a single sensor technology. *Excludes ARB fridges and fridge bundles, (Low fixed freight for AK, HI, Canada & Mexico - all orders shipped from North Carolina). Power ON LED should glow. Sleeve the outer grey sleeve of the sensing wire unto the height of the PVC pipe. Now slowly dip the Pump OFF sensor inside the water, now the Pump should remain OFF. Take an electrical PVC pipe of 3/4th inch or 1 inch which is commonly available. In OH Tank, lift slowly both Pump ON sensor and Pump OFF sensor above water level.
Now the power connection is completed. The sensor head has five foot long stainless-steel probes to accurately detect when the water is at various levels. Sensing Connection includes the cabling of sensing wire, i.e.,6Pair CAT 5e from the Water Level Controller to the Overhead Tank (OH Tank). %PDF-1.2 Our sensor rods will not foul, plate or deteriorate no matter the water quality and the system comes with a 100% Satisfaction Guarantee. This will bypass the Flow sensing function ensuring proper functionality of remaining features of automation excluding dry-run protection. Set the level of Pump OFF sensor (yellow wire) at the bottom of the Sump at about 4 to 5 inches above Foot Valve level in the Sump. We offer products comparable to the products offered by the above companies. Insulation Tape, necessary screws and wooden gattas pieces for mounting controller. STEP 1. STEP 8. Connect those wires to the four terminals of ON button (i.e. STEP 8. After cabling, making the level sensing arrangement in the water tanks and Sensing connection of the sensing cable to the Water Level Controller. Wiring issue, 1985 T1950, wiring diagram available? The power supply can go into a new or existing electrical panel that has the well pump relay (110VAC coil) and the booster pump relay (110VAC Coil).
At Waterline Controls, we are confident youll find our products safe and easy to install yourself. Sensing Cable Connection to Water Level Controller. Non contact design eliminates the requirement of material compatibility between the liquid and the sensor, especially on corrosive Deionized Water and Reverse Osmosis water. The Water Level Controller system will have four Nos. Isolate the Main Power Supply before the Power Connection Procedure and. For you and your family, the safe and accurate control of the holding tank water level makes the difference between having drinking water for your home and not having it. STEP 9. They are mentioned for comparison purposes only. Now the power connection is completed. STEP 5. Our level sensors and controls arent just for use in residential potable water holding tanks; some models are suitedcooling towers, boilers andbuilding fire protection water tanks. To test the flow sensor, remove the joint of flow sensor to brown wire, keep the brown wire outside water and lift both ON and OFF sensor probes from the water to switch. Holding tanks can vary greatly in size, from small ones that hold about 2,500 gallons to large ones that hold 144,000 gallons. Identify four terminals of starter ON Button (i.e. STEP 4. Monitor Panel M21VW, https://www.garnetinstruments.com/rv-shop/, https://www.rvupgradestore.com/RV-Tastem-s/164.htm, Help! As the source of water is Bore well, the sump sensing function have to be bypassed in the controller itself. STEP 1. The Power Connection is the connection between the Water Level Controller and your existing Starter with which you are presently operating the Pumpset. TVMSDBWK-002 contains only the Wiring Loom. It remains in focus throughout the design and manufacturing process. STEP 6b. All of our liquid level controls and liquid level sensors are assembled right here in the U.S.A. where we monitor every step of the process. Multi strand 1.5 Sq.mm. Set the level of Common sensor (red wire) at the bottom of the Sump. Put a layer of insulation tape on top of terminal blocks to avoid any contact of sensing cables with power terminal block. NOT SURE WHAT YOU NEED? Put the Auto/Manual Switch of Level Controller to Manual Mode and them switch ON the Power. Recorre nuestra galera de productos.Cuando encuentres un producto de tu preferenciaclickea en "Aadir"! Identify Phase & Neutral wire in the Starter with LINE TESTER after switching ON the power supply. Unit will not operate correctly in these cases. Email: cswatertechnologies@gmail.com, Inbuilt Timer For Low Source Borewell Pump, Installation Procedure for Water Level Controller. Now OH Tank testing is completed.
Also make sure that Flow sensor does not touch the Delivery pipe. Non contact level sensors small design also reduces installation time and the amount of personnel needed to install.
Again slowly dip the Pump ON sensor also inside the water, now the Pump should. Up to six tanks can be monitored through the TVMS. Connect the removed motor wires to Output Terminal PHASE O/P and NUTRL O/P of Water Level Controller To give the Sensing connection in the underground sump, initially decide the levels at which the pump has to switch ON and switch OFF. If you do have questions, were available at888-905-1892to walk you through the installation process. Cut the pipe about 12 inches less than the height of the sump so that pipe can be hanged vertically inside the sump. STEP 4. Do the 6 pair CAT 5e sensing wire cabling from the level controller to overhead tank and leave 1.5 to 2 meter extra cable near overhead tank. Important: The Sensing wire from the unit to OH Tank and unit to UG Sump / Well should be a one-piece wire and there should be absolutely no joints in these Sensing wires and these wires should not be damaged in any way. This can be done by immersing and lifting of the sensor arrangement in the OH Tank water. After it exits the bottom of the trailer, my wires run along the propane line. The Single Phase Borewells will usually have a starter with start capacitors and run capacitors inside. Take precautions to see that the joint will not get inside the water when tank is full. (Not applicable for Bore well Pump sets.). STEP 5. The sensing arrangement should be away from the wall of the tank and also should be away from the water falling into the tank. Attached is a pic JohnB sent me of his wiring diagram for the control panel. As usual procedure, ON Level can be 30% of tank capacity and OFF Level can be 4 to 5 inches above the Foot valve of the suction pipe of Pump set. To Control such starters the control wiring will be done only to the ON and OFF Push Buttons. STEP 3. STEP 10. Power Connection from the (220V AC) Single Phase Starter to the Water Level Controller.
Water is drawn into the hold tanking via a motorized pump placed in the well. Now immerse Pump OFF sensor also inside the water, now pump should switch OFF immediately. A well water holding tank is a large storage tank that holds water drawn from a well. Identify the Power Terminal Block with sticker of connection details in Water Level Controller. TVMSDBWK-001 includes all parts. If you dont see a model that works for you, we can create acustom control. This is an independent, unofficial site. Also, the liquid level sensors we use are low-voltage and low-ampere, greatly reducing the chance of injury due to electrical shock during installation or maintenance. Don't expect miracles they are notoriously inaccurate. Waterline Controls, with over 25 years of experience, makes the products you and your family can count on and provides a5 Year Limited Warrantywith all of its units.
When that happens, malfunctions occur. if you want a particular brand Cost of Water Level Controller please Call:8095379069, 8123795696, 162, 5th Cross, Brindhavan Layout TC Palya Bangalore 560 036 India Make the loop of the sensing wire, to hang the sensing arrangement to the top portion of the sump with the help of a hook or nail. It can be insulated after testing of the system, as explained later).
Again slowly lift the Pump OFF sensor also, above the water, now pump should get switched OFF immediately. Connect Phase and Neutral from the starter to the Power Input Terminals PHASE I/P and NUTRL I/P. To give the Sensing connection in the Overhead Tank, initially decide the levels at which the pump has to switch ON and switch OFF. Cut the pipe about 2 inch less than the height of the tank so that pipe can be hanged vertically inside the tank. Quality isnt an afterthought with Waterline Controls. The web site you have selected is an external one located on another server. pump should remain ON. Don't forget, you may need these parts to go with this: The Water Tank Sensor Kit allows the RedVision Total Vehicle Management System (TVMS) distribution box to measure the water level in an RV/motor home clean water tank. To bypass the sump sensing function, Yellow wire, Black wire, Green wire and Red wire have to be just shorted and insulated with Insulation tape. CuttingPliersorNosePliers. STEP 2. Fix the Flow sensor to the mouth of the Delivery Pipe in the overhead tank with cable tie or insulation tape, in such a way that the pumped water will flow through that sensor. Connect back the brown wire to flow sensor and now insulate it with the insulation tape. Your system comes with a color-coded wiring diagram: the sensor head colors are matched to the same colored wires power supply. The liquid level sensors we use are low-voltage and low-ampere, and greatly reduce the chance of injury due to electrical shock during installation or maintenance. STEP 6.
Thank you for visiting GEMS Sensors & Controls web site. For ON Button connection, connect four wires, i.e., two wires for ON BUTTON-A PARALLEL CON. terminals and two wires for ON BUTTON-B PARALLEL CON. terminals of 4 way terminal block of Level Controller. The tradenames and trademarks in this page are owned by their respective companies or are the same name as the company. It neither endorses the information, content, presentation, or accuracy, nor makes any warranty, express or implied, regarding any external site. The relays need 110VAC coils so they can be wired into the Waterline Controls Power supply (PS2) that is provided with this set-up. STEP 4.
Copper Power cable of about 2 to 6 meters as per requirement. Then start testing the OH Tank function. Remove the bottom cap of the Water Level Controller and identify the coloured sensing wire bunches on the bottom opening of the Unit. STEP 10. The Water Tank Sensor Kit allows the RedVision Total Vehicle Management System (TVMS) distribution box to measure the water level in an RV/motor home clean water tank. STEP 3. If you do have questions, were available at 888-905-1892 to walk you through the installation process. One ground wire to all, one sensor wire to each sensor. The advantage of having loose sensing wire over the sensing terminal block is that, loose contacts are avoided and testing of the controller functions can be done easily by shorting the sensing wires of controller directly. Repeat the steps from STEP 4 to STEP 7 for four to five times to ensure the correct operations. For more information, refer to the RedVision Instruction Manual. Thanks john, I may do that upgrade. Now lift only Pump OFF sensor from the water, Pump should remain OFF.
I believe the colors are somewhat standard as to their purpose. STEP 3. All of our liquid level controls and liquid level sensors are assembled right here in the U.S.A. All of our products, whether level controllers or liquid level sensors, are made in our US-based facility. STEP 5. Now also lift Pump ON sensor from the water, now Pump should switch ON again. This will introduce a 15 second delay for all ON operation. STEP 7.
Save a service fee for a water level switch installation.
Now short the two delay wires and insert it inside the sleeve firmly. DX-WLC Model Level Controller for (220V AC) Single Phase Pumpset /Starter. In fact, many of our first models, developed in the 1980s, are still in use today. STEP 9. Identify the Power Terminal Block with sticker of connection details in Water Level, Controller. Thats why a reliable sensor that requires minimal maintenance is so important. Some models are suited to applications such ascooling towers, boilers andbuilding fire protection water tanks. SUPPORT WARRANTY CONTACT US PACKAGE OPTIONS RESOURCES. Sign up for the REDARC newsletter to stay up to date with the tips, technical information and product releases. And all of this can be caused by sub-par sensors. We can accommodate businesses and properties with dozens or even hundreds of apartments or condominiums. Operate the ON and OFF button of the starter to Confirm that the motor is working in Manual Mode. In-vehicle Dual Battery Chargers & Isolators, Electric Trailer Brake Controller Vehicle Selector, RedVision Total Vehicle Management System. STEP 2. There are some good you tube videos showing these.
Put the Auto/Manual Switch of Level Controller to Manual Mode, switch ON the, Mains to Confirm that the motor in working in Manual Mode.
2021 Gems Sensors, Inc. All rights reserved. of 2 way terminal blocks for power terminations mounted as shown in the Photo for the Bore well Motor. I checked continuity from the 22 gauge (small wires) at the control panel, to the 18 gauge (big wires) under the trailer frame. Vinos: http://www.lolamorawine.com.ar/vinos.html, Regalos Empresariales: http://www.lolamorawine.com.ar/regalos-empresariales.html, Delicatesen: http://www.lolamorawine.com.ar/delicatesen.html, Finca "El Dtil": http://www.lolamorawine.com.ar/finca.html, Historia de "Lola Mora": http://www.lolamorawine.com.ar/historia.html, Galera de Fotos: http://www.lolamorawine.com.ar/seccion-galerias.html, Sitiorealizado por estrategics.com(C) 2009, http://www.lolamorawine.com.ar/vinos.html, http://www.lolamorawine.com.ar/regalos-empresariales.html, http://www.lolamorawine.com.ar/delicatesen.html, http://www.lolamorawine.com.ar/finca.html, http://www.lolamorawine.com.ar/historia.html, http://www.lolamorawine.com.ar/seccion-galerias.html. Too little water means inadequate water pressure and potential dry running of equipment both of which leads to expensive repairs to holding tanks and associated equipment. I found the wiring conduit near the tank senator's control panel. Power Connection from the (220V AC) Single Phase Starter / MCB / DP Switch to the Water Level Controller. One length of 3/4th or 1 inch dia. Waterline Controls 8350 E Evans Road Ste C3 Scottsdale, AZ 85260, FREE: 1-888-905-1892 LOCAL: 1-480-905-1892 EMAIL: info@waterlinecontrols.com. STEP 5. STEP 5. STEP 6. Connect in parallel) without disturbing existing starter wires. STEP 5. The kit includes cable, sensor probes and crimp lugs. STEP 3. Keep the delay wires (thin wires) open before testing procedure. Like always John, you're a wealth of good information, and knowledge!! STEP 2. STEP 2. Gems RLI-80 Non Contact Radar Water Level Tank Sensor, Learn more about the ULS-100 Water Tank Level Sensor >. Another OFF BUTTON SERIES CON. terminal of the Level Controller has to be connected to stop button terminal from where wire was removed in step 6a. Repeat the steps from STEP 2 to STEP 5 for four to five times to ensure the correct operations. We don't find any widget to show. Sleeve the outer grey sleeve of the sensing wire unto the height of the PVC pipe. STEP 6. STEP 4. STEP 4. Made it look very easy. Continuity of wire should be checked before wire is laid. STEP 7. 6. >$0Jw~_6XN/;N'{S(6BwD+K6l/` nBe9:6LpAi{_/poii=7BnU 5b3v. Most water tanks use a water tank mechanical float switch to help clear sewage and water applications but these switches are too unreliable and usually dont last more than 3 years. Monitor Manual, Sunline Coach Owner's Club - Sunline Owner's Files - K.I.B. STEP 11. The Water Tank Sensor Kit includes all parts needed to accurately measure the clean water levels in an RV/motorhome. Now put the Auto/Manual Switch of Level Controller to Auto Mode. Sleeve wires for about 3 to 4 inch, twist the sleeved wire around the sensors provided and crimp the sensors to the end of those wires Now fix the sensors at different levels of the pipe as per the levels decided, with insulation tape in the following order: . If they are not repaired or replaced, they will fail entirely. Set the level of Pump ON sensor (black wire) approximately at One Foot above the Sump medium sensor in the Sump. Too many times, the traditional well water holding tank sensors are sub-par. Suspend both UG sump and OH tank sensing arrangements in proper position and tie it to ensure the same. STEP 4.
See our website pages for further information on the products. Slide the black PVC sleeve provided over the twisted joint completely. Looks like you only need to splice in a red and brown wire under the camper to whatever they go to. Waterline Controls is a registered trademark of System Dynamics, Inc. Click on the link below to complete the form on the next page and we will provide specifications and pricing on the right unit to meet your need. The cable plugs directly into the TVMS and includes sensor probes to be fitted to the water tank and crimp lugs to connect the cable to the probes. Non contact design also ensures there are no issues with hard water leaving mineral deposits on float-based sensors, causing them to fail. STEP 3. usually a Green Push switches mounted on the door of the starter. Commercial potable water systems and industrial applications involving livestock or industrial processing also use well tankers. STEP 4. ), STEP 1. STEP 1. FREE SHIPPING on orders over $99 in Contiguous US. Mysterious Water in my Fresh Water Holding Tank. Now switch OFF the Mains and remove the output terminals of the starter or DP, switch, i.e. If you are ready to replace your water well tank float switch with a reliable, economical, minimal maintenance alternative, you can buy one here today orgive us a callif you have any questions. Regardless of its application, though, it is crucial to know how much water is in the holding tank to ensure that the well and pump are being used efficiently. In UG sump, slowly lift the Pump ON sensor (topmost sensor) above the water, the. Wiring at the control panel appears correct. All the connections between the power supply and the sensor are color matched to make the installation easy and fast.