and hit Get End Angle to calculate the angle between walls. What is the relationship between casings and base moulding. By choosing I Accept, you consent to our use of cookies and other tracking technologies. Primed Finger-Jointed Crown Moulding, 5093 - 3/4 in. this would give the necessary void behind crown to allow lighting to work. on A solar generator gives you backup energy from the sun should your electricity fail. Measure and cut crown moulding with a straight cut to fit in between the blocks. But first, here are a couple of common questions wed like to answer about this project: Use a layout square to check and see if your corners are equidistant. In these instances, the moulding comes to a point like the bow of a ship. That indeed is rocket science made simple. The position will automatically give you the compounding bevel. What part of my cutting am I doing wrong? U can even incorporate the 1x into your crown if u want with a bead under crown or just hide flat side of 1 x behind crown. Here's what to know before you buy, This week on Houzz we were inspired to break out of catalog styling ruts and let our design freak flags fly, Design advice, inspiration and observations that struck a chord this week, Etiquette columnist Lizzie Post tackles the challenge of accepting and displaying home decor gifts from frequent visitors, Spend less time weeding, less money watering and more moments just sitting back and enjoying your healthy garden, Leaf blowers, trucks or noisy neighbors driving you berserk? Come join the discussion about tools, projects, builds, styles, scales, reviews, accessories, classifieds, and more! While learning how to cut crown moulding, remember: Square cuts are the simplest and are used to create a butt joint, where the cut end of the moulding fits flush in a corner. With the miter saw set to 0 degrees, make a straight cut to create the butt joint where the end of the moulding will be flush against the wall in the corner. I agree with craftsman jay. All Rights Reserved. Why not give it a try? No it is not. or can you tell me how much the angle would be off in 24 with a miter of: Then I can measure the out of square distance and adjust to the approximate angle. Wider crown would be tougher if the top is being left open for lighting. (Oh wait, that would be me! Scarf joints are used to connect two pieces of crown moulding when the wall is longer than a single piece of the trim. Then it will fit snug to your other crown. Here is a URL for DeWalt. 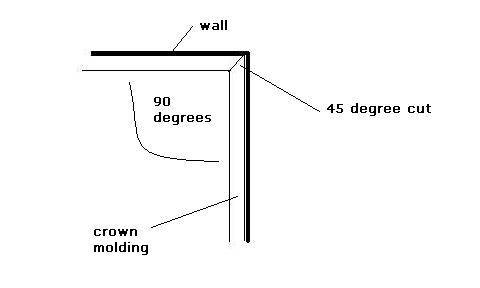 I put a pencil line on the molding to make sure I don't screw it up because, well, because I have. I looked at the charts that detail all the different angles for my compound miter saw. Start your subscription today and save up to 70%. If you are ready to transform your home with crown moldings and you are not a professional contractor or woodworker , you may need our tips that how to cut a 90 degree crown molding corner , inside corner and outside corner . Here is how to cut the types of moulding that rest true against a wall. If you've benefited from this free service please consider helping us support: Rest bottom of molding against the fence and top of molding against table. I plan to use the laser level to give me a line to set blocks cut to match the spring angle, and then secure the crown to the blocking. One room has a fireplace which juts out 8" and the "outside" corners are not 90 degrees. I can confidently To learn more or opt-out, read our Cookie Policy. I bought a corner piece that you nail up in the corners and then just install the moulding to each side of it. Products shown as available are normally stocked but inventory levels cannot be guaranteed, For screen reader problems with this website, please call 1-800-430-3376 or text 38698 (standard carrier rates apply to texts), WM 49 9/16 in.
 And corners are not usually completely square because there is so much tape and drywall mud in a corner and that changes its relationship to the walls on each side of it. Make sure they cover the floor and counters and just ball it all up and take away with them. Were here to tell you, See how to find the right trim for the height of your ceilings and style of your room, Landscape Architects & Landscape Designers, Outdoor Lighting & Audio/Visual Specialists, Why Marble Might Be Wrong for Your Bathroom, You Said It: Every Room Should Have the Right Wrong Thing and More, You Said It: The Wrong Sink Can Make You Hate Your Kitchen. "My greatest creation wasn't made with my hands. Never was good in Trig..got lost after the teacher said bring two sharp pencils to class. If the piece isn't real long, you can do a fine coping job with a table jigsaw. Then cope off the cut following the line between the face of the crown and that 45 degree excess. Mark the measurement on a piece of trim molding with a pencil. Need Help?
  Take your time. Once again, this adjustment will have a special marking on most saws. I've been a trim carpenter for thirty years and the only time I have had any trouble with an inside corner not looking right is when I mitered it. They are all inside corners. I still like a nice coping saw and a coarse sanding sponge for the fine tuning. Put the first end of the molding under the blade. Is that correct? use 88 deg. We position our saw to the left at the 45 degree miter angle and then make a cut. Crown moulding enhances the decor of any room. identify wood flooring- red or white oak? As you said--try cutting some scrap first. The products included in this article are available at various home improvement stores, local home centers, and online retailers like Amazon. If you help us with a definition of the FEELING you want, all the rest will flow easily. Hold crown in place against the installation clips, then use the heel of your hand to firmly tap the molding into the clips. I would then use a piece of scrap to determine the angle needed to give a good fit. Hold phone (long edge) horizontally against first wall, with screen facing straight up. Your wall is 92? Copy, have laminated, and have at it. The bottom of your crown (most detail) will be up on your saw & against the fence. For the molding coming from left side of the corner ,we are going to make a miter cut on the right side. All rights reserved. Requires basic carpentry skills and experience using a power miter saw, $200-$600 for an average-size room, depends on size and style of crown molding. Enter Our Dog Days of Summer BBQ Giveaway Now! I bet Youtube has some good tutorials. I really never have been able to uderstand why certain subjects create so much confusion?Not particularly this thread,its been fairly straightfwdbut Crown in general? But plunge pools fill the middle ground, give a splash of fun, and offer relaxation in smaller yards. The way I've seen the experts cope crown is to,first, make a 45 degree cut on it. I'm about to add crown molding to 2 bedrooms in my daughter's house and discovered the walls are not at 90 degrees (inside angles). Hi there, I am putting in some 3-1/4" standard crown molding. Most is routine molding, but one vaulted section has walls that meet the ceiling at 45 deg instead of 90. Then using a coping saw follow the profile of the cut. On most saws, 31.6 is specially marked. I can't imagine having all of that pulled off. To help you with orientation, remember that the more decorative part of crown moulding is usually on the bottom, so keep it against the fence when cutting. Is Your Garden Cut Out for Matisse Inspiration? Now place phone against second wall, holding the same way,
What looks wrong and how do I fix it? Somos un fabricante de 10 aos de molduras de cornisa, zcalo, rosetones, molduras de iluminacin indirecta,Perfiles para iluminacin,panel de piedra decorativa, panel de ladrillo, No.2 Huashan Road,Gaoyou City,Jiangsu,China, Copyright 2012 - 2021 Myfulldecor.com | All Rights Reserved | Powered by, How to Cut An 90 Degree Crown Molding Corner. For a better experience, please enable JavaScript in your browser before proceeding. Those angle detents are for cutting crown on the flat.
Take your time. Once again, this adjustment will have a special marking on most saws. I've been a trim carpenter for thirty years and the only time I have had any trouble with an inside corner not looking right is when I mitered it. They are all inside corners. I still like a nice coping saw and a coarse sanding sponge for the fine tuning. Put the first end of the molding under the blade. Is that correct? use 88 deg. We position our saw to the left at the 45 degree miter angle and then make a cut. Crown moulding enhances the decor of any room. identify wood flooring- red or white oak? As you said--try cutting some scrap first. The products included in this article are available at various home improvement stores, local home centers, and online retailers like Amazon. If you help us with a definition of the FEELING you want, all the rest will flow easily. Hold crown in place against the installation clips, then use the heel of your hand to firmly tap the molding into the clips. I would then use a piece of scrap to determine the angle needed to give a good fit. Hold phone (long edge) horizontally against first wall, with screen facing straight up. Your wall is 92? Copy, have laminated, and have at it. The bottom of your crown (most detail) will be up on your saw & against the fence. For the molding coming from left side of the corner ,we are going to make a miter cut on the right side. All rights reserved. Requires basic carpentry skills and experience using a power miter saw, $200-$600 for an average-size room, depends on size and style of crown molding. Enter Our Dog Days of Summer BBQ Giveaway Now! I bet Youtube has some good tutorials. I really never have been able to uderstand why certain subjects create so much confusion?Not particularly this thread,its been fairly straightfwdbut Crown in general? But plunge pools fill the middle ground, give a splash of fun, and offer relaxation in smaller yards. The way I've seen the experts cope crown is to,first, make a 45 degree cut on it. I'm about to add crown molding to 2 bedrooms in my daughter's house and discovered the walls are not at 90 degrees (inside angles). Hi there, I am putting in some 3-1/4" standard crown molding. Most is routine molding, but one vaulted section has walls that meet the ceiling at 45 deg instead of 90. Then using a coping saw follow the profile of the cut. On most saws, 31.6 is specially marked. I can't imagine having all of that pulled off. To help you with orientation, remember that the more decorative part of crown moulding is usually on the bottom, so keep it against the fence when cutting. Is Your Garden Cut Out for Matisse Inspiration? Now place phone against second wall, holding the same way,
What looks wrong and how do I fix it? Somos un fabricante de 10 aos de molduras de cornisa, zcalo, rosetones, molduras de iluminacin indirecta,Perfiles para iluminacin,panel de piedra decorativa, panel de ladrillo, No.2 Huashan Road,Gaoyou City,Jiangsu,China, Copyright 2012 - 2021 Myfulldecor.com | All Rights Reserved | Powered by, How to Cut An 90 Degree Crown Molding Corner. For a better experience, please enable JavaScript in your browser before proceeding. Those angle detents are for cutting crown on the flat.
Inside corners should be coped. Finally put the two pieces together to reach a outside corner . On the outside corners you need to cut the angle as close as you can. I agree with above but he left out what your problem is, the corner not at a 90 degree angle. as kaschmi mentioned, you can bring the crown out further from the wall with a 1x added behind the crown. Drywall compound was the saving grace. Unless your crown is really huge cutting with the bottom edge up and the crown sitting on the saw table in the same orientation as it will on the wall will give you excellent results. It looks as though the tiles are glass. Gosh Gary Katz makes it look easy. Step Four: Reverse the settings and repeat. Use these flats to keep the piece firmly in position on the saws base and fence when making a cut. Crown Molding: Is It Right for Your Home? What coping blade fine or course? Saved my bacon. Two pieces are cut at opposing 45-degree angles and overlap to create a splice.
Make sure it's pointing away from the section of the trim you measured. Thanks for all your help and suggestions. If there are some gaps ,just use chaulk to fill the joints . just have to work lighting out with the blocks A forum community dedicated to Do it yourself-ers and home improvement enthusiasts. When I ran into this problem when installing crown in my house I found that the best solution was trial and error. Schneider Electric Recalls Line of Electrical Panels, How to Install Cable Rail Around Wood-Post Corners, Podcast 481: Detailing a Slab, High-Performance Water Heaters, and DIY Dense-Pack, Podcast 480: PRO TALK With Painter-Remodelers Miquel and David McCarley, Industry-First Cordless Rebar Cutter and Bender, Plus, get an extra 20% off with code GIFT20, 10 Steps to Install Crown Molding on Cabinets, Choosing the Right Construction Tape for the Job, Pretty Good House Book Excerpt: Copper Farmhouse, 10 Dos and Don'ts for Electric In-Floor Heat, Framing Stairs to an Out-of-Level Landing, Good-Looking and Long-Lasting Traditional Gutters, The Fine Homebuilding Interview: William B. Using the "old" bosch miter finder (not the new one that's out now) use the reciprocal angle. If your saw permits you will find it easier to use crown stops and cut vertical. This simple cut is to be used in between crown moulding corner blocks, as described below.
Get complete site access to expert advice, how-to videos, Code Check, and more, plus the print magazine. Cut an 90 degree inside corner for crown moldings. If theyre not at a perfect 90 degree angle, use an angle finding tool (aka bisecting adjustable square) to find the exact degrees (see next question). We recommend our users to update the browser. It has nearly all the information you'll need. IOW, if you push the crown down the wall, the open joint @ ceiling will close. The second piece will then be cut to fit over it .
BTW, other than those random opinion statements I think the Houzzers are really bringing it for you - what a community resource! All you need to cut is the miter. I did build an open square box which would hold the trim at the ceiling/wall angleso I could see the backside after I did the cope to see what needed to be taken off to improve the cut. I am going to get a piece of wider crown to see if that will help. A coped joint is much better. Then just rasp, file it down if needed. I am hoping the wider crown will give me more room to hide the discrepancies in the wall/ceiling joint. Carefully follow the pencil line as you trim through the back side of the moulding. A forum community dedicated to professional woodworkers and enthusiasts. As you learn how to cut crown moulding, practice with smaller scrap pieces to save frustration later. the saw setting will be 44 deg. Crown "dogs" which will position the crown on the saw the same way every cut are a great investment. Pressing the Escape (ESC) button will close the modal and bring you back to where you were on the page. The moulding has flat edges where it touches the wall and ceiling. The only thing you have to keep straight is to put the molding against the fence upside down and set the miter for the right direction. What feeling do you want when all the fuss and expense is complete? Even if you cope the joint you must have the relationships (wall/ceiling/saw fence/angle)right or the cope will be open in its own way.Of course, it will be easier to caulk the h3ll out of an open coped joint than that open miter.Casey. Starrett makes an excellent miter protractor that gives you the correct miter angles. What should I do? Houzz Pro: One simple solution for contractors and design pros. If you cannot do that, you need to alter the orientation at the saw; the upside-down crown needs to be less on the table, more on the fence; taller, not flatter, if you follow.I always ascertain the wall/ceiling coordinates of a crown by placing a piece in the angle of a framing square and taking its measure. Three more bedrooms rooms to go when I return in early summer. Local store prices may vary from those displayed. Copyright 2001 - 2022 Greg Tarrant - blocklayer.com, Directly Measure Wall Angles with Your Phone. White Vinyl Subway Peel and Stick Decorative Wall Tile Backsplash (10-Pack) LKA2300B0, Prime-Line Sliding Closet Door Bottom Guide, 4-3/16 in., Plastic, White (2-pack), Daltile Restore Green 3 in. Then, make the cope to fit into it. More than 10 Year of Polyurethane/PU Cornice Mouldings, Crown Molding ,Chair Rail Molding, Baseboard Molding, Ceiling Medallions ect decorative mouldings manufacturing, professional and reliable polyurethane Faux Stone Panels, Decorative Stone Siding, Faux Brick Panels partner in China. The color does not look bad. Yeah, for small angles you don't really need a trig table/calculator -- an inch at 24" = so many degrees, to reasonable accuracy. For the molding coming from right side of the corner ,we will make a miter cut on the left side. This technique of how to cut crown moulding inside corners requires an inexpensive hand saw called a coping saw to remove material in the back of the mouldings leading edge. Knowledge of the four types of crown moulding cuts makes your DIY room improvement project easier. You love its beauty and instant high-quality appeal, but bathroom marble has its drawbacks. Its a best practice to cut crown moulding upside down on the miter saw. You will have shards all over the place. The QO Plug-on-Neutral Load Centers can overheat causing burns and fire hazards. The wall corners weren't square and some walls and ceilings were bowed.
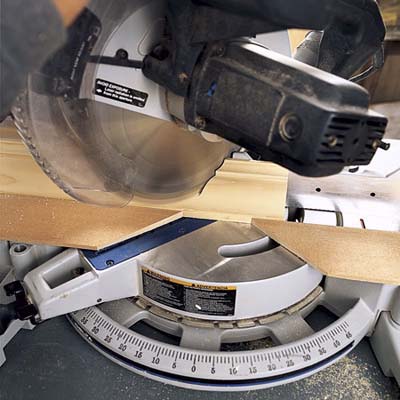
Coping sounds like a more difficult skill to learn than cutting crown, so I'm trying to avoid that. I'll be using crown molding with a 52/38 degree wall angle. Divide by two and that's the angle you set your miter at. Far from perfect but close enough. on the wall let the 1x hang down a bit below the crown and you could run 3'4" cove under up tight to the 1x or even some type of quarter round and cut angled blocks to attach to the 1x for the crown to nail to later. I had an old Bosch 10 slider for a lot of years before I gave it to my BIL. Rent tools and trucks for any project at The Home Depot. It can be made out of wood, medium density fiberboard (MDF), metal and many other types of materials. The 5 Best Solar Generators (2022 Review). Step One: Set the miter angle to 31.6 degrees. Create and Print Full Scale PDFs with diagrams on this page (templates). There's a lot of opinion statements in this thread that seems really random in nature: paint the beams, remove the beams etc. There's no way to install conventional crown on a vertical wall that is met by a sloped ceiling, and have it touch the wall and the ceiling while still meeting neatly at your coped/mitered joints at the wall. Pluged in 44 degrees and got 88.698. Why are the joints of my crown molding ending up like this? We are going to place our molding in the saw with the lip that touch the ceiling pressed flat on the saw up against the fence. The saw can be adjusted to cut at any angle set it to 45 degrees for one side of a standard 90-degree corner. Thanks so much. Posted by There are also many different pattern options, ranging from bold to more conservative. Coping one end simply exposes the profile as a sharp cut, which can then be 'tuned' for a seamless fit. I've given it to a lot of people, that way wherever the saw is, the diagram for crown is with you too. For a better experience, please enable JavaScript in your browser before proceeding. Very easy and I think it looks better with it than with it, IMHO. Try to cope the moulding. x 3/4 in. Gary Katz probably has videos on this but I know he uses the Collins' coping foo with a barrel grip jigsaw. Use of this site is subject to certain Terms Of Use. Get home building tips, offers, and expert advice in your inbox. You might have a talent for it. Turn the blade to 45 degrees outward. Got an idea for a new calculator, or improvements / additions to existing ones? 2022 The Taunton Press, Inc. All rights reserved. The piece on the left of the corner (first piece ) comes all the way to the wall ,so we just need to cut the piece that comes from the right. The Fora platform includes forum software by XenForo, http://www.woodweb.com/knowledge_base/Crown_moulding_along_cathedral_ceilngs.html, http://www.garymkatz.com/TrimTechniques/cutting_crown_transitions.html, VerticalScope Inc., 111 Peter Street, Suite 600, Toronto, Ontario, M5V 2H1, Canada. The most of common inner corner in the room is standard inside 90 degree corner. Finishing is 3 parts chemistry and 1 part VooDoo :shifty: The Fora platform includes forum software by XenForo, VerticalScope Inc., 111 Peter Street, Suite 600, Toronto, Ontario, M5V 2H1, Canada. The Kim Six Fix This Old House general contractor Tom Silva shows how to enhance a room with easy-to-install crown molding using plastic clips and caulking to finish. Black Floating or FLush House Number 2 30726, Shop ANSI Grade 1 (Best) Modern Passage Door Handles, Silver Single Hose Portable Air Conditioners, Overload protection Mini Split Heat Pumps, Shop Botanical Grass Cloth Wallpaper Rolls, Shop Art Deco Ceiling Fans Without Lights, Buy LONGKING 12 in. Those who say it cannot be done shouldn't interrupt the people doing it. Crown moulding outside corners, or outside miters, are cuts used when a room includes more than just four corners. Position our saw to the right at the 45 degree miter angle and then make a cut. Note: This method is for cutting crown molding to fit a 90-degree corner. If you have a 92 degree wall set the saw at 1 degree from 45 and cut an inside miter. What Is the Optimal Temperature for a Greenhouse? I had just one of my glass tiles replaced due to cracking with installation and it was a huge mess. Corners usually are not very crisp and tend to be slightly rounded where the points of the molding cant go all the way in. Try reading up on some info about coping. Please also read our Privacy Notice and Terms of Use, which became effective December 20, 2019. - M.K. Brace the flat top of the moulding on the base of the saw and the flat bottom of the moulding against the saws fence. Here is how to cut crown moulding outside corners: Wall corners are rarely a perfect 90 degrees and gaps in the wood joints can be unsightly and dont create a finished look. Fill any gaps between the crown molding and ceiling with caulk. Measure Twice Cut Once -- It's a lot easier to cut more off then it is to cut. We position our saw to the left at the 45 degree miter angle ,hold our molding up into position and we make our cut. Measure the distance from corner to corner on the first wall. Hit Get Start Angle to record the directional angle of this wall. Then thoroughly vacuum the floors with a brush attachment. But even coping is a learned technique. I tried to cope one but did not come out very well and did not have a good rasp to fine tune it. Use it for your project, then bring it back no maintenance required, and you wont need to store it. We are no longer supporting IE (Internet Explorer). Once you have the measurement, take your angle finding tool and line it up on your miter saw with the laser light to create a center line. On calculators with Slider Controls, drag slider tab to get close, then use keyboard cursor keys to fine tune. Get the latest This Old House news, trusted tips, tricks, and DIY Smarts projects from our expertsstraight to your inbox. We have the options that miter the both pieces to create a corner or cope the moldings .We will go over both methods and start with miter technique.All of the corners we made will be put into the saw in same way, the only thing we need to change is the miter angle of the cut blade .If you have a compound miter , set to zero . I will take your suggestion and cut test patterns. x 96 in. Barely out of square (probably 89.5 degrees). We position our saw to the right at the 45 degree miter angle ,hold molding up into place and we make our cut. PVC Composite Inside Corner Molding, #16-1/2 x 1-5/8 in. Thanks for the response. To compensate for this ,it is helpful to remove a small amount from the unexposed part at the bottom of the molding using a utility knife . If you continue to have difficulties, you could consider using corner blocks. I have two corners which are about 1/8 and the other 1/4 off when measured with a square at the 24 inch side. Installation is simple enough, but making the angle cuts for corner pieces requires attention to detail to produce your desired results. I just finished with crown in my family room. Place the molding upside down against the saw fence, and make the compound-angle miter cut for the inside corner. 14 Things You Need to Start Doing Now for Your Spouses Sake. DIY Putty and paint make a carpenter what he ain't!! Repeat the process, marking and cutting the trim with an outward 45-degree angle. Make this cut exactly like we did for the mitered corner by moving the saw to the left 45 degree miter angle and we make our cut . This leaves only the decorative profile to fit against its match in the corner like a piece of a jigsaw puzzle. Two Easy Zipper Pouch Tutorials, 35 Ways to Repurpose Cribs (and Parts of Cribs). A power miter saw is the best way to cut crown moulding once you measure the angles. Cut a miter angle on the adjoining length of molding, then apply a bead of acrylic latex caulk to miter joints. Tricking the eye is often the most clever fix, better than tearing out a functional backsplash. You could use a carpenter square or protractor/angle finder to get the true angle and adjust the miter cut accordingly, but that can be frustrating. Glazed Ceramic Subway Wall Tile (12.5 sq. With the molding coming in on the right side of the corner will make a miter cut on the left side of our molding . Fasten the plastic installation clips to the wall using 2-inch drywall screws. If the world was perfect you would have perfect corners but that hardly ever happens because of the floating and taping process. I Googled Archtan and got a calculator. And I don't like the corner blocks because IMO they're for people who can't cut proper miters. Installing a crown molding is a easy and low cost way to make room look more elegant and refined.It make your room feel less boxy and bland , best of all ,it can increase the value of your apartment . This site is protected by reCAPTCHA and the Google. Always start with a full piece of crown on the wall you see when you walk in the room. It will make it easier than trying to find the angles. Then you have all strainght cuts on the crown. JavaScript is disabled. I always use the vertically nested method so that you only have to adjust the miter angle. I'm not sure I like this crown cut. Keep the moulding steady by holding it against your miter saw or workbench. The saw can be set to 45 degrees to the left or 45 degrees to the right. Here are some supplies and tools we find essential in our everyday work around the shop. Here's a link to check out (go about 3/4's down the page to see some pics/drawings. By slanted ceiling of u mean ceiling not level or cathedral ceiling, How about a piece of 1 x on the wall with the top rip an angle the pitch of your ceiling cut to one constant size put on level line nail in there would be a void between 1 x and the corner Sheetrock in some points but will have same reveal behind crown moulding. Place the first piece of moulding upside down on the saw with the scrap end to the right. Adjust the power miter saw's blade angle using the bisecting adjustable square. Brace the moulding as you did before and make a cut near the end of the moulding. Make a 45-degree inside miter cut on the piece to be coped. Now lets take a look at how we handle the same corner using coping method .On one side of our corner ,we will just have the molding(first piece ) running all the way into the wall . Please note the top part of the molding should be longer than the bottom. For the left side of an outside corner, swing the blade to the left and keep the right end of the cut. I'm cutting on a 12" compound miter saw, putting the molding upside down, flush against the table and the fence, measuring each corner with a protractor and cutting 1/2 of the measured angle (most are 88 or 92 degrees). x 3-5/8 in. How to create wood detail around bathroom mirror. Houzz is the new Internet. Please call us at: 1-800-HOME-DEPOT (1-800-466-3337), Please enter in your email address in the following format: you@domain.com. How to Install Crown Molding Around Corners, How to Fix Baseboards with a Repair Patch, How to Install Kitchen Cabinet Crown Molding. Cut it upside down and cope your inside corners. Helping You to Do It Yourself! Hold the two pieces of trim in place on the wall the outside miter cuts should butt against each other at the outside corner.
Molding position placed on the saw is same as cutting inside corner, molding in the saw with the lip that touch the ceiling pressed flat on the saw up against the fence. If it is off a bit you can roll the molding so they both line up nice. Its this butt joint that a piece of coped moulding will fit against. Measure the angle.
With this method the crown can be laid flat on the saw, which makes the whole process a little easier and a lot more precise. Just a rule of thumb I was taught by a master carpenter. Looked at Amazon but still did not find a good rasp set. Maybe try a warmer bulb in your lights. Step Three: Lay the crown flat and cut.