If you close your eyes, its easy to imagine yourself sitting next to a gurgling creek in the middle of the woods.
When foaming, wear gloves and be sure to wear something that wouldn't mind throwing away.
All tip submissions are carefully reviewed before being published. If your stream is relatively small say it's about 2 to 3 feet (0.6 to 0.9m) wide and 2 to 3 inches deep estimate about 5 gallons (18.9L) of water per linear foot. Then set the two concrete blocks into place and wiggle them into the sand until the tops are level with the edges of the frame. Buy low-voltage pumps online at discount-pumps.biz, or ask at the local landscape supplier. Stack a few stones, then pour some water over them to see how it flows (Photo 3).
Just the sound of the water makes you feel cooler!
From a higher vantage point, we can see the full length of this enormous waterfall complex, the bright green foliage of the trees surrounding the falls, and the orange ornamental fish living in the pond. We added several large trees & this meandering pondless stream surrounded be lush woodland plantings. Connect the pump to a length of tubing with a hose clamp. Always measure the slope of your spillway with a level. Use this hole to install the pump. One source is discount-pumps.biz. Rock waterfalls with water garden plants with Ultimate Services, Very private backyard enclave waterfall with fire pit and screened in patio.
From the leftover material, cut a 20-in.
wikiHow is a wiki, similar to Wikipedia, which means that many of our articles are co-written by multiple authors. If you're having trouble keeping your spillway stone in place, sometimes a larger stone on top of it will anchor it in place while you build its base.
Measure out how many linear feet your entire stream takes up. Houzz Pro: One simple solution for contractors and design pros.
So if your stream capacity is 100 gallons (378.5L), a 50 gallon (189.3L) basin and a 200 gallon (757.1L) pool will easily accommodate the stream.
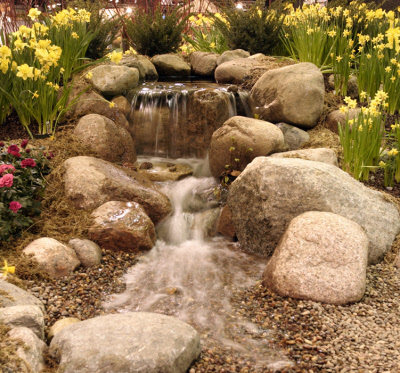 Welcome to our gallery spotlighting a massive collection of the best and most beautiful garden waterfalls from around the world. A shallow set of waterfalls leading into a murky pool. For this we used gray stones that ranged from 2 to 2-1/2 inches in diameter.
 This pond with a stone waterfall is slightly off the beaten path of the yard, with large stepping stones leading through the mulch to the side of the shallow pond.
Two empty into the larger waterfall, while the other enters just off to the left. Another look at the stone waterfall and pond with the fairy sculpture.
By signing up you are agreeing to receive emails according to our privacy policy. across, but if you have room, make it bigger. Create a better waterfall effect by cutting a groove on the underside of flat stones. Once you dig out the upper pool and lower basin, install your sump basin so you can collect the water at the bottom of the waterfall.
This pond is mostly still, with a wide waterfall on one side, spilling narrow streams of water down the rock faces.
In a more expansive garden, a small waterfall leads out from between flowered bushes and splashes down into a shallow, winding stone stream ending in a larger pond. Redirect the water by tilting the stones with small shims.
 First, estimate the amount of water that passes through a linear foot of your stream. Not sure if we will be buying a pre-built or digging, "I had previously built a large pond and decided to add a waterfall your easy to follow videos were just perfect for.
 square of pond liner and lay it in the center as padding for the two concrete blocks. When you think youve got enough, add a few more for good measure. Complete DIY projects like a pro! Ferns and tall waterplants hang over the edges. We were a little surprised at how much digging there was, considering the size of the reservoir. A large waterfall with a top reservoir and tropical plants around the edges. The sound of water moving over rocks is inherently soothing, and larger cascades toss mist into the air, creating a cooling effect outdoors and acting as a humidifier indoors.
A closer look at the waterfall section of the above water feature, showing the carefully placed stone blocks and the landscaping that makes the man-made structure feel far more natural. A tall waterfall empties into a pool and then again into a shallow stream below. Tree branches hang over the water, reflecting in the murky pond surface. To create this article, 15 people, some anonymous, worked to edit and improve it over time. Some of the waterfalls youll see have layered slabs of stone, while others have boulders that are round or square. To learn how to plan the size of your stream, keep reading! Thats why this is one of our favoritesmall backyard waterfalls. 2020 NARI CotY Award Winning Residential Landscape Design/Outdoor Living, Renovations Unlimited, Grove City, Ohio, 2020 Regional CotY Award Winner, Residential Landscape Design/ Outdoor Living over $250,000, Walnut Creek California family design backyard.
Two stone statuettes of ducks sit on either side of the main falls. Inspiration for a traditional backyard stone waterfall in Seattle. We spent about $150 for 700 lbs. How to Build a Water Garden With Waterfall. At a Pond supply store, Landscape & Irrigation supply store, maybe Home Depot etc.
Back Yard Renovations with Water Feature - Aurora, CO.
A gallery featuring a huge selection of large and small garden waterfalls with ponds and streams.
The rock wall behind the falls is covered in small outcroppings that are smothered in moss and algae. Some empty into shallow pools, with others tumble into deeper wells.
Attach the rebar with 1/2-in. A floral carpet surrounds this beautiful waterfall, which leads into a crystal blue pond. Cut an access hole in the hardware cloth about 8 in. Pour water over the stones occasionally to see how it's flowing. The erosion caused by the stream over time has worn fantastic swirls into the stone bed of this shallow stream, with a waterfall at the top.
To learn how to plan the size of your stream, keep reading! There are a thousand ways to build a backyard waterfall.
From above, the artificial bumpers of the multiple streams are clearly visible. Pond supplies stores online and in larger cities will carry submersible pond pumps specifically designed for pond use. The groove causes the water to drip rather than flow back along the underside of the stone. You can cause the water to drip rather than follow the underside of the stone by cutting a drip groove (Photo A). A three-tiered stone waterfall that ends in a tiny but deep well. Design ideas for a traditional full sun backyard stone waterfall in Boston. copper plumbing straps (Photo 2). The bigger the reservoir, the less often youll have to fill it with water. layer of sand over the dirt and level it out.
The duct seal putty also prevents the tubing from being crushed by the top stone. ", one. Including a waterfall in your garden is an excellent way to add an atmosphere of luxury.
Weve provided a Materials List in Additional Information below so youll know what to shop for.
We had to rearrange the stones a few times, but in the end the water flowed nicely over the edges and created just the effect we wanted. Bend the hardware cloth down around the outside edges of the box to hold it in place and hide sharp edges.
Lay the pond liner in the frame and fold the corners. This article has been viewed 445,663 times. If the water isnt running in the right direction, shim under the stone to tilt it and redirect the water flow (Photo B). An angle grinder with a metal-cutting disc is a better option.
Otherwise, the article was simple, clear and straightforward. % of people told us that this article helped them.
References Alternatively, if the foundation is difficult to excavate, try using a combination of rocks and gravel as your base. While this waterfall is clearly not natural, the layered stones allow water to cascade into a pool, giving off a cooling mist for the seating area nearby.
A single large boulder sits in the shallows. Flowers are kept in containers on the rocks for color. When youre done, cover the rebar with galvanized 1/4-in. A low evergreen ground cover is creeping across the rocks towards the water. When placing the underlayment and liner, be sure to leave slack at the bottom of each waterfall. Frozen in time, we can see mist and the way the water fans out. Then start stacking the stone. A winding stream follows the long stone stairway down to this patio. By using this service, some information may be shared with YouTube. This article has proved to, "We have decided to build a pond in our yard with a waterfall.
"I have started my pondless waterfall project, I have been looking at all information and videos you have put on the.
Complete redesign of sloped back yard to great a beautiful garden path with flagstone steppers, surrounded by plenty of perennials, shrubs, trees, all placed in fresh mulch.
Basins need holes to allow the water to come in. Build a Backyard Waterfall in One Weekend. hardware cloth. So if you're planning on introducing fish into your pond, be sure to use one that's specifically designed for use alongside fish.
Moving around the side, drill a hole every 4 inches. Small cobblestones or rocks jutting out from beneath spillways can give accent to an otherwise uniform waterfall.
All it takes is a little insight on creating your flowing waterfall itself, and you'll be ready to make your own. In this case, 80% of readers who voted found the article helpful, earning it our reader-approved status. Include your email address to get a message when this question is answered.
A closer look at the side of the waterfalls shelf. If the water isnt flowing the way youd like, here are a few tips to try.
The first step is to cut the 2x8s to length and nail or screw them together.
The water continues into a stream. ", rocks is impractical for my use.
Design ideas for a mid-sized modern partial sun backyard landscaping in DC Metro for summer. A final look at the pond at night. We made the mistake of starting off with a pump that was too small and were unhappy with the amount of water flowing. Here we also used the putty to secure the tubing between the top two stones.
A stone garden waterfall near the side of the home surrounded by large tropical plants. Dont forget to pick up three or four 5-gallon buckets full of crushed stone for the base. Stone steps lead down from the backyard to the patio.
For the serious builder or the curious homeowner, making the waterfall is a lot of fun.
The sales person will know what pump can handle that flow and total lift. This article has been viewed 445,663 times. Then spread a 1-in. You can download and enlarge Figure A in Additional Information above.
Exactly what kind of pump do I need to buy?
How to Build a Pond and Waterfall in the Backyard. Itll cost a little more because in addition to the pump you have to purchase a transformer (about $35), but thats a small price to pay to avoid digging a deep trench.
Youll use this access hole to clean out the reservoir occasionally and to remove the pump in the winter if you live in a cold climate. A rambling downhill stream empties into a large garden pond with a patch of lilypads at the center. You can also order a pump online.
The flow of the waterfall follows the hill, with the home on the very top.
But if youre looking for simplicity, you cant beat this approach.
Pink snapdragons and other wildflowers grow along the hilly meadow. Set the frame in the hole and level it (Photo 1). Additionally, as you browse several landscape ideas and landscape pictures and make notes about the designs and landscapes that really jump out at you, keep in mind what level of ongoing maintenance is actually feasible. Just lift the stone and wedge the shim underneath.
Remove rocks, dirt chunks and other debris from the dirt and rake it roughly level.
Well-executed landscaping ideas can upgrade your home's entire aesthetic, and the right plants, flowers and shrubbery can greatly enhance your curb appeal by adding color, texture and even fragrance to your yard. Some sump basins will come already perforated, but many will not. Visit a "rock," "quarry," or "gravel and stone" dealer in person to get a feel for what kinds of stones your waterfall might enjoy.
Thanks to all authors for creating a page that has been read 445,663 times. I am very confident and eager to complete our waterfall project, I am lucky to have a wife with a green thumb, our back yard is like a botanical garden. They should have it at any store that sells pond liners and supplies. Next cut pieces of 1/2-in. Your water can simply fall from your spillway down. Large white boulders surround the complex. Low-voltage wire only needs to be buried a few inches. The ground surrounding it is covered in thick moss and algae. Stacking the stone was fun. Youll also find a complete Materials List, which you can download. Using 2x8s like we did, youll need a hole thats about 8 in.
Here's what you can expect to order when it comes time to buying stones for your waterfall: 1.5 - 2 tons of large (12 - 24 inches) boulders for upper pool and lower basin, plus 2 - 6 tons extra for 10 feet (3.0m) portions of stream that are above ground, .75 ton of medium (6 - 24 inches) rocks per 10 feet (3.0m) of stream, .5 ton of small (.5 - 2 inches) gravel per 10 feet (3.0m) of stream, plus 1 - 2 tons for the upper pool and lower basin each. You basically dig a hole in the ground, line it with rubber membrane and cover it with a stack of rocks.
But this was the only tough part. Approved. Large pots of yellow mums add a pop of color to the landscaping. Spread the stone out near the reservoir so you can choose the size and shape you want.
Waterfalls are a type of water feature that are typically found in conjunction with other water features like garden ponds or stream gardens. Starting from the bottom, drill a hole into the side of the basin using a 2 inch bit.
A view down the stone steps at the waterfall and pond. Alderwood Landscape Architecture and Construction, National Association of the Remodeling Industry, Outside Dreams Landscape Design and Construction, Landscape Architects & Landscape Designers, Outdoor Lighting & Audio/Visual Specialists. Make a dam out of duct seal putty to prevent water from rolling off the back of the waterfall. Web.
This pond sits in the center of an enormous garden and features a two-tiered waterfall and a deep pond with ornamental fish and lilypads.
With an existing pool and retaining walls, we took this space and made it more modern offering many various spaces for lounging, enjoying the fire, listening to the water feature and an upper synthetic turf area for playing games. The absolute minimum slope you need is a 2 inch (5cm) drop for every 10 feet (3m) of stream.
You do not need an upper pond. To build a waterfall, start by picking an area with a natural slope or hill, or digging out a slope yourself. We recommend our users to update the browser.
square and between two lengths of rebar. Does it have to pump a certain number of gallons per hour?
Now, simply make sure that either your upper pool or lower basin holds more than the total stream capacity. Fold the pond liner to fit the inside corners and let the extra drape down the outside of the frame.
Then stack stones on top in an arrangement you like. Photo of a contemporary drought-tolerant backyard waterfall in Phoenix with decking. To create this article, 15 people, some anonymous, worked to edit and improve it over time. Whether it's a manicured front lawn, stone-paved pathway or intricate landscape design, landscapes benefit from the same attention to detail that the interior of your home does. This garden waterfall has a small ledge of rock extending like a miniature bridge over one of the falls. Large slanted boulders run along the edges of this man-made creek somewhat cover the small cascades along its length.
When it does, see how it flows and make final adjustments by shimming the stones (Photo B). Learn more A waterfall is the perfect accent for a backyard. Sign up for wikiHow's weekly email newsletter. Posted on Published: May 15, 2015- Last updated: July 2, 2021. Finally, connect a pump to to the sump basin and make sure the hose extends back to the upper pool so you can resend the water to the top of the waterfall. If you love working with plants, a large rose or vegetable garden is the perfect use of land; if you live in a hot or dry area, consider drought-tolerant landscape ideas. An artificial garden waterfall, when viewed very closely, is a sight to behold.
The pools they empty into may contain aquatic plants like lilypads or algae, or even large or small ornamental fish, depending on the depth or size of the pool. The use of larger, "I want to build a pond and waterfall in my garden, but was a little scared to tackle it. Will be sending you pictures off the final results, thank you. Lastly, when it comes to landscapes, be sure to consider different front and backyard ideas, as they are separate entities that serve two very different purposes. ", me it isn't half as scary as I thought!
Contact Us, 53 Backyard Garden Waterfalls (Pictures of Designs), 27 Beautiful Bathrooms With Clawfoot Tubs (Pictures).
Layered sedimentary stones make up this water well and waterfall complex surrounded by small wildflowers and grasses.
Pour a 1/2- to 1-in. Even the smallest cascades cause ripples, bubbles, and a soothing sound. Photo of a traditional full sun backyard stone waterfall in Boston.
{"smallUrl":"https:\/\/www.wikihow.com\/images\/thumb\/9\/9f\/Build-a-Waterfall-Step-1-Version-4.jpg\/v4-460px-Build-a-Waterfall-Step-1-Version-4.jpg","bigUrl":"\/images\/thumb\/9\/9f\/Build-a-Waterfall-Step-1-Version-4.jpg\/aid401225-v4-728px-Build-a-Waterfall-Step-1-Version-4.jpg","smallWidth":460,"smallHeight":345,"bigWidth":728,"bigHeight":546,"licensing":"
License: Creative Commons<\/a> License: Creative Commons<\/a> License: Creative Commons<\/a> License: Creative Commons<\/a> License: Creative Commons<\/a> License: Creative Commons<\/a> License: Creative Commons<\/a> License: Creative Commons<\/a> License: Creative Commons<\/a> License: Creative Commons<\/a> License: Creative Commons<\/a> License: Creative Commons<\/a> License: Creative Commons<\/a> License: Creative Commons<\/a> License: Creative Commons<\/a> License: Creative Commons<\/a> License: Creative Commons<\/a>
\n<\/p>
\n<\/p><\/div>"}, {"smallUrl":"https:\/\/www.wikihow.com\/images\/thumb\/a\/ae\/Build-a-Waterfall-Step-2-Version-3.jpg\/v4-460px-Build-a-Waterfall-Step-2-Version-3.jpg","bigUrl":"\/images\/thumb\/a\/ae\/Build-a-Waterfall-Step-2-Version-3.jpg\/aid401225-v4-728px-Build-a-Waterfall-Step-2-Version-3.jpg","smallWidth":460,"smallHeight":345,"bigWidth":728,"bigHeight":546,"licensing":"
\n<\/p>
\n<\/p><\/div>"}, {"smallUrl":"https:\/\/www.wikihow.com\/images\/thumb\/3\/38\/Build-a-Waterfall-Step-3-Version-3.jpg\/v4-460px-Build-a-Waterfall-Step-3-Version-3.jpg","bigUrl":"\/images\/thumb\/3\/38\/Build-a-Waterfall-Step-3-Version-3.jpg\/aid401225-v4-728px-Build-a-Waterfall-Step-3-Version-3.jpg","smallWidth":460,"smallHeight":345,"bigWidth":728,"bigHeight":546,"licensing":"
\n<\/p>
\n<\/p><\/div>"}, {"smallUrl":"https:\/\/www.wikihow.com\/images\/thumb\/9\/97\/Build-a-Waterfall-Step-4-Version-4.jpg\/v4-460px-Build-a-Waterfall-Step-4-Version-4.jpg","bigUrl":"\/images\/thumb\/9\/97\/Build-a-Waterfall-Step-4-Version-4.jpg\/aid401225-v4-728px-Build-a-Waterfall-Step-4-Version-4.jpg","smallWidth":460,"smallHeight":345,"bigWidth":728,"bigHeight":546,"licensing":"
\n<\/p>
\n<\/p><\/div>"}, {"smallUrl":"https:\/\/www.wikihow.com\/images\/thumb\/d\/df\/Build-a-Waterfall-Step-5-Version-4.jpg\/v4-460px-Build-a-Waterfall-Step-5-Version-4.jpg","bigUrl":"\/images\/thumb\/d\/df\/Build-a-Waterfall-Step-5-Version-4.jpg\/aid401225-v4-728px-Build-a-Waterfall-Step-5-Version-4.jpg","smallWidth":460,"smallHeight":345,"bigWidth":728,"bigHeight":546,"licensing":"
\n<\/p>
\n<\/p><\/div>"}, {"smallUrl":"https:\/\/www.wikihow.com\/images\/thumb\/1\/1d\/Build-a-Waterfall-Step-6-Version-4.jpg\/v4-460px-Build-a-Waterfall-Step-6-Version-4.jpg","bigUrl":"\/images\/thumb\/1\/1d\/Build-a-Waterfall-Step-6-Version-4.jpg\/aid401225-v4-728px-Build-a-Waterfall-Step-6-Version-4.jpg","smallWidth":460,"smallHeight":345,"bigWidth":728,"bigHeight":546,"licensing":"
\n<\/p>
\n<\/p><\/div>"}, {"smallUrl":"https:\/\/www.wikihow.com\/images\/thumb\/2\/2f\/Build-a-Waterfall-Step-7-Version-3.jpg\/v4-460px-Build-a-Waterfall-Step-7-Version-3.jpg","bigUrl":"\/images\/thumb\/2\/2f\/Build-a-Waterfall-Step-7-Version-3.jpg\/aid401225-v4-728px-Build-a-Waterfall-Step-7-Version-3.jpg","smallWidth":460,"smallHeight":345,"bigWidth":728,"bigHeight":546,"licensing":"
\n<\/p>
\n<\/p><\/div>"}, {"smallUrl":"https:\/\/www.wikihow.com\/images\/thumb\/2\/22\/Build-a-Waterfall-Step-8-Version-3.jpg\/v4-460px-Build-a-Waterfall-Step-8-Version-3.jpg","bigUrl":"\/images\/thumb\/2\/22\/Build-a-Waterfall-Step-8-Version-3.jpg\/aid401225-v4-728px-Build-a-Waterfall-Step-8-Version-3.jpg","smallWidth":460,"smallHeight":345,"bigWidth":728,"bigHeight":546,"licensing":"
\n<\/p>
\n<\/p><\/div>"}, {"smallUrl":"https:\/\/www.wikihow.com\/images\/thumb\/d\/db\/Build-a-Waterfall-Step-9-Version-3.jpg\/v4-460px-Build-a-Waterfall-Step-9-Version-3.jpg","bigUrl":"\/images\/thumb\/d\/db\/Build-a-Waterfall-Step-9-Version-3.jpg\/aid401225-v4-728px-Build-a-Waterfall-Step-9-Version-3.jpg","smallWidth":460,"smallHeight":345,"bigWidth":728,"bigHeight":546,"licensing":"
\n<\/p>
\n<\/p><\/div>"}, {"smallUrl":"https:\/\/www.wikihow.com\/images\/thumb\/2\/27\/Build-a-Waterfall-Step-10-Version-3.jpg\/v4-460px-Build-a-Waterfall-Step-10-Version-3.jpg","bigUrl":"\/images\/thumb\/2\/27\/Build-a-Waterfall-Step-10-Version-3.jpg\/aid401225-v4-728px-Build-a-Waterfall-Step-10-Version-3.jpg","smallWidth":460,"smallHeight":345,"bigWidth":728,"bigHeight":546,"licensing":"
\n<\/p>
\n<\/p><\/div>"}, {"smallUrl":"https:\/\/www.wikihow.com\/images\/thumb\/e\/e7\/Build-a-Waterfall-Step-11-Version-2.jpg\/v4-460px-Build-a-Waterfall-Step-11-Version-2.jpg","bigUrl":"\/images\/thumb\/e\/e7\/Build-a-Waterfall-Step-11-Version-2.jpg\/aid401225-v4-728px-Build-a-Waterfall-Step-11-Version-2.jpg","smallWidth":460,"smallHeight":345,"bigWidth":728,"bigHeight":546,"licensing":"
\n<\/p>
\n<\/p><\/div>"}, {"smallUrl":"https:\/\/www.wikihow.com\/images\/thumb\/1\/10\/Build-a-Waterfall-Step-12-Version-3.jpg\/v4-460px-Build-a-Waterfall-Step-12-Version-3.jpg","bigUrl":"\/images\/thumb\/1\/10\/Build-a-Waterfall-Step-12-Version-3.jpg\/aid401225-v4-728px-Build-a-Waterfall-Step-12-Version-3.jpg","smallWidth":460,"smallHeight":345,"bigWidth":728,"bigHeight":546,"licensing":"
\n<\/p>
\n<\/p><\/div>"}, {"smallUrl":"https:\/\/www.wikihow.com\/images\/thumb\/3\/31\/Build-a-Waterfall-Step-13-Version-2.jpg\/v4-460px-Build-a-Waterfall-Step-13-Version-2.jpg","bigUrl":"\/images\/thumb\/3\/31\/Build-a-Waterfall-Step-13-Version-2.jpg\/aid401225-v4-728px-Build-a-Waterfall-Step-13-Version-2.jpg","smallWidth":460,"smallHeight":345,"bigWidth":728,"bigHeight":546,"licensing":"
\n<\/p>
\n<\/p><\/div>"}, {"smallUrl":"https:\/\/www.wikihow.com\/images\/thumb\/d\/d3\/Build-a-Waterfall-Step-14-Version-3.jpg\/v4-460px-Build-a-Waterfall-Step-14-Version-3.jpg","bigUrl":"\/images\/thumb\/d\/d3\/Build-a-Waterfall-Step-14-Version-3.jpg\/aid401225-v4-728px-Build-a-Waterfall-Step-14-Version-3.jpg","smallWidth":460,"smallHeight":345,"bigWidth":728,"bigHeight":546,"licensing":"
\n<\/p>
\n<\/p><\/div>"}, {"smallUrl":"https:\/\/www.wikihow.com\/images\/thumb\/7\/7e\/Build-a-Waterfall-Step-15-Version-3.jpg\/v4-460px-Build-a-Waterfall-Step-15-Version-3.jpg","bigUrl":"\/images\/thumb\/7\/7e\/Build-a-Waterfall-Step-15-Version-3.jpg\/aid401225-v4-728px-Build-a-Waterfall-Step-15-Version-3.jpg","smallWidth":460,"smallHeight":345,"bigWidth":728,"bigHeight":546,"licensing":"
\n<\/p>
\n<\/p><\/div>"}, {"smallUrl":"https:\/\/www.wikihow.com\/images\/thumb\/f\/f4\/Build-a-Waterfall-Step-16-Version-2.jpg\/v4-460px-Build-a-Waterfall-Step-16-Version-2.jpg","bigUrl":"\/images\/thumb\/f\/f4\/Build-a-Waterfall-Step-16-Version-2.jpg\/aid401225-v4-728px-Build-a-Waterfall-Step-16-Version-2.jpg","smallWidth":460,"smallHeight":345,"bigWidth":728,"bigHeight":546,"licensing":"
\n<\/p>
\n<\/p><\/div>"}, {"smallUrl":"https:\/\/www.wikihow.com\/images\/thumb\/c\/ca\/Build-a-Waterfall-Step-17-Version-3.jpg\/v4-460px-Build-a-Waterfall-Step-17-Version-3.jpg","bigUrl":"\/images\/thumb\/c\/ca\/Build-a-Waterfall-Step-17-Version-3.jpg\/aid401225-v4-728px-Build-a-Waterfall-Step-17-Version-3.jpg","smallWidth":460,"smallHeight":345,"bigWidth":728,"bigHeight":546,"licensing":"
\n<\/p>
\n<\/p><\/div>"}, {"smallUrl":"https:\/\/www.wikihow.com\/images\/thumb\/e\/ef\/Build-a-Waterfall-Step-18-Version-3.jpg\/v4-460px-Build-a-Waterfall-Step-18-Version-3.jpg","bigUrl":"\/images\/thumb\/e\/ef\/Build-a-Waterfall-Step-18-Version-3.jpg\/aid401225-v4-728px-Build-a-Waterfall-Step-18-Version-3.jpg","smallWidth":460,"smallHeight":345,"bigWidth":728,"bigHeight":546,"licensing":"