i.e. I get this error when I tried to run the script "TypeError: My name is Shahzada Fahad and I am an Electrical Engineer. The magnitude of the electrochemical potential across the glass bulb is linearly related to the pH according to the Nernst equation. I performed a series of tests using different liquids and once satisfied I further modified the code to display the pH value on the Oled display module. I added the library correctly bit there are some matching errors. 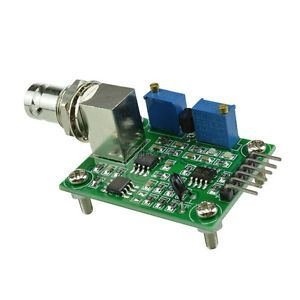 Inside setup (), LCD commands are written for displaying a welcome message on LCD. Once the code is uploaded the OLED display will start showing the value of Ph. This is the analog pH sensor kit from the DIY MORE which is a bit different from the one developed by the DFrobot. Sometimes code is not visible to smart phone users. By knowing the Ph, we can monitor the water quality in Agricultural Farm and also in Fish Farming. My recommendation is go for the DFrobot pH sensor. The last pin is the To which is the temperature output. Where PH 0 is very acidic, PH 7 will be neutral and PH 14 very alkaline. hello sir .. Then, sort the Analog values received in ascending order. The output voltage should be connected with the VIN pin of the Arduino Nano. Nevertheless, I am sharing for whom anyone proceed it without display.
In function void setup(): sketch_may21b:32: error: no matching function for call to SimpleTimer::setInterval(long int, void (&)()) timer.setInterval(500L, display_pHValue); void SimpleTimer::setInterval(uint64_t) void setInterval(uint64_t interval); In function void loop(): sketch_may21b:35: error: class SimpleTimer has no member named run timer.run(); // Initiates SimpleTimer, Hi, im trying to calibrate my sensor but the lower number i can get is 4.03, can u help me, i need this for a project. If you remember I did all the testing with Arduino Uno, but this time I am using the Arduino Nano. Ca hng HSHOP IN T V ROBOT
In this project we will design a Ph Meter by Interfacing Analog Ph Sensor with Arduino. The electrode plug should be kept clean and dry. The term H is defined as the negative log of the hydrogen ion concentration. If you worked with PH metering before you will know that PH values range from 0-14. These are the PCBs I received from the ALLPCB Company. Help me J1 is the female DC power jack and this is where we connect the input power supply. I also used the DFrobot pH sensor kit for measuring the water quality using the Arduino board and I also used the pH sensor kit from the DFrobot in an IoT based water quality monitoring system using the NodeMCU ESP8266 WiFi module. Calibration of the PH electrode is very important in this project. A pH value of 7 is neutral, as pure water has a pH value of exactly 7. Please try viewing the page through computer. The analog output pin Po is connected with the Arduinos analog pin A0. We will also learn about the construction & working of the Ph Sensor. As an upgraded version of pH meter V1, the sensor greatly improves the precision and user experience. I also added female headers on the left and right sides of the Arduino Nano for connecting the jumper wires.
The reference electrode is insensitive to the pH of the solution, being composed of a metallic conductor, which connects to the display.  I may make a commission if you buy the components through these links. If you measure the acidic sample, the pH value of the standard solution should be 4.00.If you measure the alkaline sample, the pH value of the standard solution should be 9.18.Subsection calibration, just in order to get a better accuracy. Hi, thank you for the diagram and code. Now the next step is to open the serial monitor. If you compare the pH sensor from the DIY MORE with the pH Sensor from the DFrobot you will find the pH sensor from the DIY MORE is cheap, but when it comes to the use and accuracy the pH sensor from the DFrobot is simply amazing. This pH Sensor Kit can measure pH values of different liquids with a good precision. The purpose of this function is to display the pH value on the Oled display module. . This pH Sensor Kit has an on-board voltage regulator chip due to which it can be easily powered up using 3.3 to 5.5Vdc. Next, the calibration value is defined, which can be modified as required to get an accurate pH value of solutions. Note:If you want to measure the pH value of other solution,you must wash the pH electrode first! Values lower than 7 are acidic and values greater than 7 are basic or alkaline.
I am currently doing a special project here in my place for measuring pH level of water with Raspberry Pi Pico and I cannot find any video or code in any website or organization.
pH meter Arduino, pH Meter Calibration, DIYMORE pH Sensor Arduino Code, Click to share on Twitter (Opens in new window), Click to share on Facebook (Opens in new window), Click to share on WhatsApp (Opens in new window), Click to share on Telegram (Opens in new window), Click to share on Tumblr (Opens in new window), Click to share on LinkedIn (Opens in new window), Click to share on Reddit (Opens in new window), Click to share on Pinterest (Opens in new window), Click to share on Pocket (Opens in new window), Click to share on Skype (Opens in new window). This can be taken as the reference solution for the calibration of the sensor. The ph of milk is between 6.5 to 6.7. : In function void setup(): sketch_apr19a:32:40: error: no matching function for call to SimpleTimer::setInterval(long int, void (&)()) timer.setInterval(500L, display_pHValue); ^ note: candidate: void SimpleTimer::setInterval(uint64_t) void setInterval(uint64_t interval); candidate expects 1 argument, 2 provided In function void loop(): sketch_apr19a:35:9: error: class SimpleTimer has no member named run timer.run(); // Initiates SimpleTimer ^~~, no matching function for call to SimpleTimer::setInterval(long int, void (&)()), Here is a link to download the simpletimer library https://www.electroniclinic.com/wp-content/uploads/2019/08/SimpleTimer.zip. Again I started with the Distilled water and waited for around 30 minutes to check if there can be any fluctuations in the pH value. As you can see the Arduino is connected with the laptop, now we will need to upload the following code to find the pH value of the distilled water. The term, widely used in chemistry, biology, and agronomy, translates the values of the concentration of the hydrogen ion which ordinarily ranges between about 1 and 1014 gram-equivalents per literinto numbers between 0 and 14. Finally, I started off by placing the components and completed the soldering Job. The board contains a pair of trimmers through which you can adjust the Analog reading offset which I will explain while calibrating the pH Sensor. Before the electrode in continuous use every time,you need to calibrate it by the standard solution,in order to obtain more accurate results.The best environment temperature is about 25 ,and the pH value is known and reliable,close to the measured value. Please help me. In case it doesnt show the correct reading, you need to rotate the potentiometer placed on Signal Conversion Board (Transmitter) V2. So you can also use Milk for calibration. If your value is different then you can adjust this value. (5) According to the linear characteristics of pH electrode itself, after the above calibration,you can directly measure the pH value of the alkaline solution, but if you want to get better accuracy, you can recalibrate it. float calibration_value = 21.34 0.7; //21.34 0.7, #define SCREEN_WIDTH 128 // OLED display width, in pixels, #define SCREEN_HEIGHT 64 // OLED display height, in pixels, // Declaration for an SSD1306 display connected to I2C (SDA, SCL pins), #define OLED_RESET -1 // Reset pin # (or -1 if sharing Arduino reset pin). The pH value can be further adjusted by changing the calibration value. The onboard voltage regulator chip supports the wide voltage supply of 3.3~5.5V. I have explained this in the video tutorial given at the end of this article. We share news, articles, projects in various electronics domains such as Embedded, Power, Analog, Digital, Audio, Internet of Thing, Artificial Intelligence, Wireless Communication, Robotics etc thus helping our readers with their projects and work. This is how everything looks after soldering and interfacing.
make the value 21.34 + 0.5=21.84. Thanks for sharing. The output signal filtered by hardware has low jitter. For the step by step explanation watch video tutorial given below. Adafruit_SSD1306 display(SCREEN_WIDTH, SCREEN_HEIGHT, &Wire, OLED_RESET); display.begin(SSD1306_SWITCHCAPVCC, 0x3C); timer.setInterval(500L, display_pHValue); using the for loop we take samples, then arrange the values, and then finally take the average. Connect its analog pin to A0 of Arduino as shown in image above. I want to learn how to combine the tds sensor with the ph sensor at the same time and then connect to the IOT Cm bin pH Gravity: Analog pH Sensor / Meter Kit For Arduino c nhp t chnh hng DFRobot c cht lng tt, chnh xc cao v l loi c s dng rt ph binhin nay do c mc gi r, thch hp vi cc bn Sinh vin, Hc sinh s dng lm m hnh, n tt nghip. For example, when the electrode is dipped in a solution whose Ph Value is 7, the reading should show 7. pH Meter using Arduino Uno and LCD Display, AMF Series 18/24/36 W Medical AC-DC Adaptors, TPP 180 and TPI 180 Medical and Industrial AC/DC Power Supplies, NTS/NTU Series Reliable, Safe, and Durable DC-AC Pure Sine Wave Inverters, IsoMOV Series Hybrid Protection Component. After you upload the program, then you can open the Serial monitor to check the pH value of some known liquid. Before I am going to explain how to calibrate and use this pH Sensor kit from the DIY MORE, first a few words about the sponsor of this article for sending me high-quality PCBs. Make sure the Arduino board is selected and also check if the right communication port is selected. To do that we need to add a 0.96 I2C OLED Display to Arduino Uno. Is there available code or sketch of this type of project using a Raspberry Pi Pico? This is required because we need to calculate the running average of samples in the later stage. After successful hardware connections, now its time for programming the Arduino. When the probe is dipped into the solution to be tested, hydrogen ions in the test solution start exchanging with other positively charged ions on the glass membrane, which creates an electrochemical potential across the membrane which is fed to the electronic amplifier module which measures the potential between both electrodes and converts it to pH units. The electronic amplifier detects the difference in electrical potential between the two electrodes generated in the measurement and converts the potential difference to pH units. When the Arduino controller gets power,you will see the blue LED on board is on. It is commonly used in various applications such as agriculture, wastewater treatment, industries, environmental monitoring, etc. Now LCD should show the correct pH value i.e. Comes in compact plastic box with foams for better mobile storage. (4)Put the pH electrode into the pH standard solution whose value is 4.00.Then wait about one minute,adjust the gain potential device, let the value stabilise at around 4.00.At this time,the acidic calibration has been completed and you can measure the pH value of an acidic solution. Now connect the V+ pin with the Arduinos 5v. Thank you and best regards. Ph Senor Arduino Interfacing Tutorial | Working, Calibration Method & Code, Copyright 2022, All Rights Reserved | How To Electronics, Please consider supporting us by disabling your ad blocker, DIY Ph Meter using PH Sensor & Arduino with OLED Display, #define SensorPin A0// the pH meter Analog output is connected with the Arduinos Analog, //Store the average value of the sensor feedback, //Get 10 sample value from the sensor for smooth the value, //take the average value of 6 center sample, #define SensorPin 0// the pH meter Analog output is connected with the Arduinos Analog, #define SCREEN_WIDTH 128// OLED display width, in pixels, #define SCREEN_HEIGHT 64// OLED display height, in pixels, #define OLED_RESET-1// Reset pin # (or -1 if sharing reset pin), LoRa Based Wireless Weather Station with Arduino & ESP32, How 433 MHz RF Module Works & Interfacing with Arduino, RFID Based Attendance System using Arduino, RTC & LCD Display, Fingerprint Based Biometric Attendance System using Arduino, https://www.youtube.com/watch?v=eCxrU_tfb9w, IoT Based Patient Health Monitoring using ESP8266 & Arduino, Interfacing MAX30100 Pulse Oximeter Sensor with Arduino, IoT Based Electricity Energy Meter using ESP32 & Blynk, ECG Graph Monitoring with AD8232 ECG Sensor & Arduino, Password Based Door Lock Security System Using Arduino & Keypad, Measure Soil Nutrient using Arduino & Soil NPK Sensor, Temperature Based Fan Speed Control & Monitoring With Arduino, Interface Capacitive Soil Moisture Sensor v1.2 with Arduino, Arduino CAN Bus Tutorial | Interfacing MCP2515 CAN Module with Arduino, Interfacing 5MP SPI Camera with ESP32 WiFi Module, Interfacing 5MP SPI Camera with NodeMCU ESP8266, Arducam | Interfacing 5MP SPI Camera with Arduino UNO, IoT Based Drinking Water Quality Monitoring with ESP32, Home Automation using Amazon AWS IoT Core & ESP32, Control Relay/LED/Lamp with AWS IoT Core using ESP32, ESP32 DW1000 UWB Indoor Location Positioning System, Hardware filtered output signal, low jitter.
How would I calibrate my pH sensor in this case? All rights reserved. Dipping the Ph electrode on different solutions will give different value as shown in the images below. For example,the pH value printed is 6.88,so the difference is 0.12.You should change the "# define Offset 0.00" into "# define Offset 0.12" in your program. Trang ch nh sn xut v hng dn s dng. How to Electronics is an electronics engineering community built and run by passionate electronics engineers. This causes a 2.5 volts tension on the Po analog output pin. We are done with the calibration and now its time to display the pH value on the Oled display module as it seems quite impractical to use the laptop or computer. The features of both of these parts are as follows. Before the pH electrode measured different solutions, we need to use water to wash it. The area on the right side can be used as the Vero Board for soldering other electronic components. Nu cn s dng trong mi trng cng nghip, cn bn v o trong thi gian di xin s dng. If you meaure the dirty aqueous solution, you need to increase the frequency of calibration. Now let us interface Ph Sensor with Arduino using Simple Arduino Code. The glass electrode for measuring the pH has a glass bulb specifically designed to be selective to hydrogen-ion concentration. Although I did the calibration, but still the value was little off which I then adjusted. (Gi lm vic/Working time: T2-T7/Mon-Sat 8h00~17h30), Cm bin pH DFRobot Gravity: Analog pH Sensor / Meter Kit For Arduino. There are various buffer solutions available in the market whose PH is fixed. Inside loop(), read 10 sample analog values and store them in an array. As you know the pH value of the lemon juice is 2, and the value on the display as you can see is almost 2. In this basic tutorial, we will learn how to interface Gravity Ph Sensor with Arduino.
So, if you want to learn how to use the pH sensor kit from the DFrobot then I highly recommend read my previous articles. Do you have code for v2? Now when the electrode is dipped in the reference solution and the PH value displayed on LCD is 6.5. I have been doing Job in UAE as a site engineer in an Electrical Construction Company. I found a code for v2 in dfrobot forum but it has no oled display. Complete code and demonstration Videoaregiven below. I used the distilled water. Now Let us display the Ph Value on OLED Display instead of Serial Monitor. A solution with a pH less than 7 is considered acidic; a solution with a pH greater than 7 is considered basic, or alkaline. Again I started with the testing. Now, its time to connect the pH sensor with the interface board.
Accepted English & Vietnamese language: sensor / cm bin, humidity / m, Cm bin pH Gravity: Analog pH Sensor / Meter Kit For Arduino, ng c khng gim tc DC Non Geared Motor, Quy trnh kim tra xc minh tnh trng bo hnh Raspberry Pi, Hng dn ci t h iu hnh cho Raspberry Pi, [COVID-19] Hshop.vn tm ngng hot ng t ngy 31/07/2021 cho n khi c thng bo tip theo, Hshop.vn l i l y quyn chnh thc ca Waveshare ti Vit Nam. The difference in electrical potential relates to the acidity or pH of the solution. The unit that we use to measure the acidity of a substance is called pH. (adsbygoogle = window.adsbygoogle || []).push({}); ALLPCB is the Worlds Fastest PCB Manufacturing Company. I started off by calibrating the pH sensor using the Arduino board, once the pH sensor perfectly calibrated, then I started by measuring the pH value of the distilled water and displayed the values on the serial monitor. Copyright 2022Circuit Digest. More accurate the voltage, more higher the accuracy! In pure water, which is neutral (neither acidic nor alkaline), the concentration of the hydrogen ion is 107 gram-equivalents per liter, which corresponds to a pH of 7. Now, pH plays a very important role in our lives and it is used in various applications. The range of pH can have values from 0 to 14. Hi, I cant find the code, havent you entered it yet? On immersion in the solution to be tested, hydrogen ions in the test solution exchange for other positively charged ions on the glass bulb, creating an electrochemical potential across the bulb. Que o (Probe) ca cmbin ch s dng trong phng th nghim, ly mu trong thi gian ngn, khng s dng mi trng thc ttrong thi gian di,u que ocn c ra sch sau mi ln o v bo qun trong dung dch KCL3N (mua cc ca hng ha cht th nghim, khng i km sn phm). The output signal is being filtered by hardware low jitter. Fahad, how are you? The small container already has the distilled water, this is how it look after connecting the pH sensor with the Interface board, the wiring remains the same. The V+ pin of the pH Sensor is connected with the 5V. This membrane is filled with a buffer solution of known pH (typically pH = 7). coming or is it already available?
https://wiki.dfrobot.com/Gravity__Analog_pH_Sensor_Meter_Kit_V2_SKU_SEN0161-V2, Hi. The construction of a pH sensor is shown above. Out of these 6 pins we will only use 3 pins; V+, G, and Po. After making these changes, again upload the code to Arduino and recheck the pH by dipping electrode in the reference solution. Then this average value is converted into actual pH value and printed on an LCD display. If you want an IoT Based Ph Meter, you can follow the IoT pH Meter Tutorial and make it work with ESP32 & Thingspeak Server. Model: DFRobot Gravity: Analog pH Sensor / Meter Kit For Arduino, 1 x Gravity: Analog pH Sensor / Meter Kit For Arduino. Similarly, pH measurement is used in a wide variety of applications like agriculture, wastewater treatment, industries, environmental monitoring, etc. Both of them are connected with each other. Ph Sensor has 3 pins that need to be connected to Arduino. To use it, just connect the pH sensor with BNC connector, and plug the PH2.0 interface into the analog input port of any Arduino controller. The Ph Sensor Kit has Signal Conversion Board (Transmitter) V2 and also pH Probe. The pH value remained almost the same. Next, I designed a PCB for the Arduino Nano, which I will use as the Development board. These are the decoupling capacitors. The simplest method to calibrate the Ph sensor is to dip the ph electrode on the solution of known strength and observe the reading. (3)Put the pH electrode into the standard solution whose pH value is 7.00or directly shorted the input of the BNC connector.Open the serial monitor of the Arduino IDE,you can see the pH value printed on it,and the error does not exceed 0.3. Then to calibrate it, just add 7-6.5=0.5 in the calibration variable calibration_value in the code. My value was a little off thats why I subtracted 0.7. Milk: Ph Value is around 6.5 to 6.7 I downloaded the library simpletimer but i have the same problem. Once the reading matches, you can stop rotating and hence the sensor is calibrated. Without any further delay lets get started!!! After adjusting the value, I was able to get the exact pH value for the distilled water. Cm bin pH DFRobot Gravity: Analog pH Sensor / Meter Kit For Arduinoc s dng o pH trong mi trng nc, cm bin bao gm mt que o (Probe) v mch x l, khuch i tn hiu c th cho ra tn hiu Analog c th c bng ADC ca Vi iu khin. This equation is used to calculate the PH value of a solution as well. This is a very basic program that we are going to use for calibrating the pH sensor interface circuit. The Nernst equation gives a relation between the cell potential of an electrochemical cell, temperature, reaction quotient and the standard cell potential. The Ph Sensor can also be interfaced with other higher-level microcontrollers like NodeMCU ESP8266 & STM32 which I will discuss in future. Hey the code is already there. The first thing to do in the program is to include all the required libraries. Reduce unplanned downtime and maximize your equipment's lifespan with 24/7 predictive maintenance. GPKKD s: 41K8019734 do UBND Qun 11 cp ngy 06/12/2017. Connect Arduino with the laptop to calibrate the pH sensor using the following Arduino code. To learn more about the Ph Sensor you can check the DfRobot official article here: Gravity: Analog pH Sensor/Meter Kit V2. To calibrate this sensor you will need a wire to short the external part and the center of the probe connector. I also added lemon juice to the Milk to check if the value will drop. Next I added some lemon juice to the water and I was amazed with the result. As this is a getting started tutorial; I will try to explain the maximum basic things. Semicon Media is a unique collection of online media, focused purely on the Electronics Community across the globe. Attention:In order to ensure the accuracy of the pH probe, you need to use the standard solution to calibrate it regularly.Generally, the period is about half a year. This conductor is immersed in an electrolyte solution, typically potassium chloride, which comes into contact with the test solution through a porous ceramic membrane. The module has an on-board voltage regulator chip which supports the wide voltage supply of 3.3-5.5V DC, which is compatible with 5V and 3.3V of any control board like Arduino. (2)Upload the sample code to the Arduino controller. With this Ph Sensor, you can quickly build the pH meter to measure the Ph value of the different aqueous solutions. we depend on ad revenue to keep creating quality content for you to enjoy for free. Also, connect the SDA SCL pin of OLED Display to Arduino A4 & A5 Pin respectively. The pH meter measures the difference in electrical potential between a pH electrode and a reference electrode, and so the pH meter is sometimes referred to as a potentiometric pH meter.
So lets get started! After adding the Lemon juice to the milk the value dropped. I would appreciate your support in this way! Click on the Upload button and wait for a while. Thank you very much for the wonderful data and video about the pH sensor. timer.run() i am getting for this line error: class SimpleTimer has no member named run. Find it difficult to use with Arduino? I have also used the same Diymore pH Sensor with the ESP32 and built an IoT pH Meter. We recommend using deionized water. If you will see a value other than 2.50 then use the trimmer to adjust this value.You know the pH value is from 0 to 14. I will show you the easiest way to calibrate the pH sensor without using any liquid or substance and then later we will measure the pH value of some known liquids. Suppose, we have a solution whose PH value is 7 (distilled water). So we are going to set it to 2.5 volts using the trimmer. Electrode blub or sand core is defiled which will make PTS decline, slow response. Sample code for testing the PH meter and get the sensor feedback from the Arduino Serial Monitor. Get Analog pH Sensor / Meter Kit For Arduino from DFRobot Store or DFRobot Distributor. The above code is already adjusted. Lemon Juice: Ph Value is in between 2 to 3, Once the code is uploaded to Arduino Board, you can open serial monitor and start testing the Ph Sensor. Hence the connection diagram is shown below. (adsbygoogle = window.adsbygoogle || []).push({}); Following are the components required for making this project. Now, you can see the value is set to 2.5Volts. The connection is fairly simple again. So, connect the VCC pin to 5V of Arduino and GND to GND. Any ideas? Due to this wide range of input voltages it can be used with 5V and 3.3V compatible controller boards like Arduino, ESP32, and ESP8266 etc.