This will help you be more prepared in learning this particular technique. The cookie is set by the GDPR Cookie Consent plugin and is used to store whether or not user has consented to the use of cookies.
You then stamp the image onto the nail. Performance cookies are used to understand and analyze the key performance indexes of the website which helps in delivering a better user experience for the visitors. Above, the blue stamper head is a sticky, squishy head and the one on the right is a firm plastic head. I prefer this rectangular stamper from Bundle Monster. When I was placing my nails flat on the desk and bringing the stamper to my nail, the image wasnt as strong and crisp. These, Last week was Halloween and I sure got tricked - a, Got my new @lightsplanneraction planner in! Stamping plates, stampers, and scrapers can be purchased separately if desired. What can I do if the stamper will not pick up the nail polish? The material and information contained on these pages and on any pages linked from these pages are intended to provide general information only and not legal advice. Then a stamper made out of plastic, rubber or silicone is used to pick up the image from the plate and transfer it to the nail. With a firmer head, its better to roll the image onto the nail. Wait for nails to dry. I found this perfect image plate on Amazon, its on sale and perfect for the Holidays! (See Step 2 under Prep your Tools). Practice first on the lint roller or a piece of paper. This is the question of the day! If you find yourself overly scraping, you may need to put less polish over the design. Nail polish remover or acetone should not be used on stamper heads because they might break down the material of the stamper head. I use an old Starbucks gift card, but many brands will sell their own flexible scraper of that shape. Included, I answer questions that you're thinking and in the end I hope to give you all the tools you need to create a successfully stamped design that makes you feel confident, original and beautiful! The polish you're using may be just fine. Youll only have to peel it off to get rid of the excess polish. The cookie is set by GDPR cookie consent to record the user consent for the cookies in the category "Functional". Now I have a wonderful article with easy-to-follow directions. Try using a polish made specifically for stamping. This site allows me to at, "I was having trouble getting the design onto the stamper. Dip your nails in a bowl of cold or ice water for approximately two minutes to help the nails dry. Grab a cup of coffee and kick back; this is a long one. The stamping plates I own are from Bundle Monster, but Born Pretty Store, Winstonia, Uber Chic, MoYou London and many other brands create and carry their own stamping plates. Stamping is an art, but after getting the motions down, it becomes easier. #dyehappy with my @gooddyeyoung Pose, Finally back into my planner! The film is tight to the plate, so pick at one of the corners to lift the surface of the sticker and peel. Are you ready to try this nail art technique? To learn more, like how to set and protect your designs to make them last longer, read on! Liquid latex, which you can learn how to use here, helps protect the skin from nail polish and makes clean up easier. Functional cookies help to perform certain functionalities like sharing the content of the website on social media platforms, collect feedbacks, and other third-party features.
Keep practicing and experimenting with different nail polishes until you learn what works for you. She runs the blog, Furious Filer, where she gives tutorials on nail care and advanced nail art. You can use a scraper made of metal or rubber. Im planning again which is, It's been a while. White polishes are the best. However, there is polish designed specifically for the stamping. Practicing first on a lint roller or paper will save you the frustration of removing your polish and reapplying over and over. Most times getting the stamper to work right out of the box is no problem. The fourth product needed for nail stamping are stamping polishes. You could also try using metallic or sparkly polishes to give your nails a pop of color. Finally, allow the design to set for 1-2 minutes before coating the nail with a clear topcoat. Here is your 15% coupon code "get15".  Many people like the polishes from Mundo de Unas, but I have yet to try them. Discover more about the small businesses partnering with Amazon and Amazons commitment to empowering them. This ensures your plate will be clean and wont leave any residue on the surface of the plate. ", http://www.goodhousekeeping.com/beauty/nails/a34522/why-base-coat-is-important/, http://www.instyle.com/news/best-base-coat-formulas-every-nail-need, http://www.instyle.com/beauty/products/how-make-nail-polish-dry-faster-tips, http://www.nailitmag.com/mastering-stamping, https://polishmeplease.wordpress.com/2013/01/28/how-to-successfully-stamp-your-nails/. It should only take you 15 seconds from start to finish to stamp each nail. So you can wash the stamper head with mild dish soap and water and it should take care of this issue. Are there any special requirements to do this correctly? Scrape speed and pressure effect the way the polish gets into the grooves of the image, which then effects how the image will transfer to the stamper. Kristi includes tips on why to use a lint roller when you stamp (what?!) This video is a great place to start learning how to nail stamp! document.getElementById( "ak_js_1" ).setAttribute( "value", ( new Date() ).getTime() ); 2022 Nail Designs | All Right Reserved. You can find stamping polishes of different finishes, like cream, opalescent, metallic or holographic. You need at least 2 kinds of nail polish colors for your nail stamping kit. Ive been wanting to get into nail stamping for a really long time but had never taken the plunge. Regular nail polish can be used, but its best to use opaque nail polish that covers the nail in one coat. What is a good nail polish to use for stamping? "I've wanted to try stamping but didn't know how.
That seems expensive at first, but the supplies will last a long time and probably wont have to be repurchased for years. Sounds like a lot of steps.
Is it possible to use gel polishes that dry under UV lamps as a stamping polish? There are different squish levels to stampers as well. Environment plays a role. We use cookies to make wikiHow great. Let's catch up. What am I doing wrong? Now I know to buff the stamper first. Apply a thin layer of stamping polish over the design on the nail plate. Other uncategorized cookies are those that are being analyzed and have not been classified into a category as yet. Its a wonderful investment, especially if you love nail art but suck at drawing even a somewhat straight line. I got mine from Winstonia. Approved. Its a loaded question, but let me give you a few tips to help: - My stamper is oily and not picking up the image! What is your first design going to be? As you can see, there are many different patterns and designs to choose from. There are several kinds and brands of stampers that you can try but several sources recommendKonad Double Side Stamp Set for beginners.  Why? If you are stamping all 10 fingers with the same design, you will need to clean your plate every time in between. Polishes that are made specifically for stamping are very pigmented because if it's too sheer, you'll have to restamp over your nail to get the opacity you want, and that could easily mess up the design. You should consult with an attorney licensed to practice in your jurisdiction before relying upon any of the information presented here. It is likely that you will be able to find higher quality tools if you purchase them separately, rather than in a single, cheap kit. The cookies is used to store the user consent for the cookies in the category "Necessary". A nail stamper can be a great way to improve your nail art skills and impress friends and family! and how to make sure you get an easy clean up when you're done. wikiHow is where trusted research and expert knowledge come together. Clean your stamper with a lint roller and the plate with pure acetone. Its just there to protect the plate during shipping. Include your email address to get a message when this question is answered. roll the stamper across the nail. Advertisement cookies are used to provide visitors with relevant ads and marketing campaigns. Carefully remove the stamper head out of the holder and submerged the stamper head in the soapy solution. Even though it is easier, you don't need to use stamping polish. Why? The acts of sending email to this website or viewing information from this website do not create an attorney-client relationship. Bring the nails to the stamper, not the stamper to the nail. When starting out, try stamping your nail art on unpolished nails. This cookie is set by GDPR Cookie Consent plugin. I find that gel polishes aren't pigmented enough to use as stamping polishes. To use a nail stamper, start by purchasing a nail stamping kit either online or at a beauty supply store. This way, if you mess up, you don't need to keep repainting your nail with a base coat of nail polish. Rub the surface with your wet fingers and do this for 10-20 seconds. polish dries before I get it onto nail. The blue film is there to protect the surface of your plate. Its the right size to fit onto my small nails. Special stamping polish is placed onto the plate. Please note, comments must be approved before they are published. How do I make polish transfer from stamper to nail? Clean your new stamper head with mild dish soap and warm water. The formula for the stamping polish is thicker and opaque so your design really pops. Shop products from small business brands sold in Amazons store. We recommend that you use only 100% acetone to clean the surface of your nail plate. Then, work quickly to paint the stamping plate, scrape the polish across it, roll the stamper over the plate and (quickly!) The cookie is used to store the user consent for the cookies in the category "Other. Some kits come with a special stamping polish. This cookie is set by GDPR Cookie Consent plugin. I think that the ideal wait time would be 15 minutes after cleaning up all 10 nails.
Found out I've not been fast enough doing the transfer, and, "Now I can't wait to try and practice. An example of a firm plastic stamper would be the one offered from Konad. But oils is natural during the manufacturing process. Stamping polishes are thicker and more opaque than regular nail polish. It picks up the images quite well and transfers them to your nails easily. This article was co-authored by Marta Nagorska. Quick-drying formulas are perfect for individuals on the go and who dont have a lot of time to wait for each coat of polish to dry thoroughly. Its a fine line, but practice will make it easier. Cap the edge of your nail. try this reverse stamping nail art design!  Today on Lounge and Learn Kristi at @beginnails shows us how to stamp a floral image fromMarianne Nails 77 stamping plate. You can even try a laminated one. Watch this nail stamping kit tutorial from Cute Polish for a better understanding of this nail art technique. A good rule of thumb is to use a polish that will cover the nail with one coat and will not be sheer. % of people told us that this article helped them. Please remember to click the link in the email to confirm. Normal topcoat may smear your stamped nail art, thats why its essential to look for a special topcoat that will keep your design intact.
 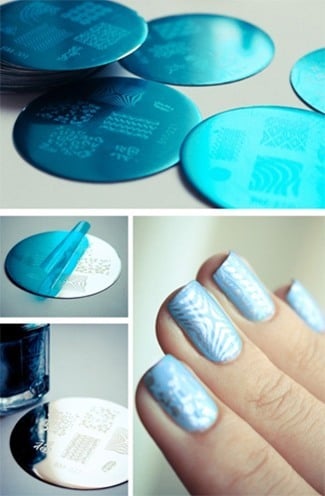 I also prefer a sticky head rather than a non-sticky head because the tackiness makes it easier to pick the image up from the plate. Attorney Advertising. There are some typical designs like roses and lace, but there are modern designs like Aztec and chevrons. You may also choose to use a cheaper kit when starting out to find out if you enjoy doing it without making a large investment. There are many different shapes, sizes and squish level. | Nail Design, Round Nails Tutorial | 3 Easy Steps To Get This Round Nail Shape, Easy & Fun Crystal Watermelon Nails (Perfect for Summer!). The one most stampers prefer are the credit card-like scrapers. Get the latest updates on new products and upcoming sales. Allow the image to dry for at least 10 minutes! If the stamper is all shiny and smooth, try using a file or buffer to make it more matte. Once you get the hang of this technique, try this reverse stamping nail art design! Clean up brush (other solutions could be: q-tip or a clean eyeliner makeup brush). Why not?
If you are using the same design on all 10 fingers, carefully clean the design on the nail plate with cotton and 100% acetone and repeat steps 2-6 until your nails are completely stamped. Another brand that seems to be wonderful is Colour Alike, which I hope to be trying sometime this summer. I have to admit, I had moments where I grew frustrated when I started learning nail art techniques. This cookie is set by GDPR Cookie Consent plugin. As long as you have the dedication and the basic materials needed to propel you forward, you can master nail stamping in no time! These days your 'gram is filled with pictures of nails of all kinds, lines, geometry, flowers, plants, wordsbut the question really is: How do I get these designs on my OWN nails?! Its really a staple in my nail stamping kit. Thanks for the help. Follow me on Facebook, Instagram and Pinterest for more interesting nail designs and ideas. This is the most important item for your nail stamping kit. Apply your Smudge Free Top Coat to seal and protect your design. The plastic wont scrape the plate, but they arent too flexible, which can create an uneven scrape or too hard of a scrape. Paint your nails in a polish color or with a clear base coat. If you do buy a plate with larger designs, you can just adjust the stamp according to the dimension of your nails. Continue this step until the surface is completely clear.
Find some creative inspiration with behind-the-scenes stories, candid interviews, and easy how-tos while you wait for that polish to dry. Thanks to all authors for creating a page that has been read 180,360 times. ", "Instructions were easily understood and quite complete!". Stamping polish is for more than just stamping. If you have longer or wider nails, you may prefer this Jumbo Stamper from Winstonia. Then there are the optional accessories. {"smallUrl":"https:\/\/www.wikihow.com\/images\/thumb\/d\/d5\/Use-a-Nail-Stamper-Step-1-Version-2.jpg\/v4-460px-Use-a-Nail-Stamper-Step-1-Version-2.jpg","bigUrl":"\/images\/thumb\/d\/d5\/Use-a-Nail-Stamper-Step-1-Version-2.jpg\/aid1095010-v4-728px-Use-a-Nail-Stamper-Step-1-Version-2.jpg","smallWidth":460,"smallHeight":345,"bigWidth":728,"bigHeight":546,"licensing":"
License: Creative Commons<\/a> License: Creative Commons<\/a> License: Creative Commons<\/a> License: Creative Commons<\/a> License: Creative Commons<\/a> License: Creative Commons<\/a> License: Creative Commons<\/a>
\n<\/p>
\n<\/p><\/div>"}, {"smallUrl":"https:\/\/www.wikihow.com\/images\/thumb\/f\/f9\/Use-a-Nail-Stamper-Step-2-Version-2.jpg\/v4-460px-Use-a-Nail-Stamper-Step-2-Version-2.jpg","bigUrl":"\/images\/thumb\/f\/f9\/Use-a-Nail-Stamper-Step-2-Version-2.jpg\/aid1095010-v4-728px-Use-a-Nail-Stamper-Step-2-Version-2.jpg","smallWidth":460,"smallHeight":345,"bigWidth":728,"bigHeight":546,"licensing":"
\n<\/p>
\n<\/p><\/div>"}, {"smallUrl":"https:\/\/www.wikihow.com\/images\/thumb\/0\/08\/Use-a-Nail-Stamper-Step-3-Version-2.jpg\/v4-460px-Use-a-Nail-Stamper-Step-3-Version-2.jpg","bigUrl":"\/images\/thumb\/0\/08\/Use-a-Nail-Stamper-Step-3-Version-2.jpg\/aid1095010-v4-728px-Use-a-Nail-Stamper-Step-3-Version-2.jpg","smallWidth":460,"smallHeight":345,"bigWidth":728,"bigHeight":546,"licensing":"
\n<\/p>
\n<\/p><\/div>"}, {"smallUrl":"https:\/\/www.wikihow.com\/images\/thumb\/a\/ae\/Use-a-Nail-Stamper-Step-4-Version-2.jpg\/v4-460px-Use-a-Nail-Stamper-Step-4-Version-2.jpg","bigUrl":"\/images\/thumb\/a\/ae\/Use-a-Nail-Stamper-Step-4-Version-2.jpg\/aid1095010-v4-728px-Use-a-Nail-Stamper-Step-4-Version-2.jpg","smallWidth":460,"smallHeight":345,"bigWidth":728,"bigHeight":546,"licensing":"
\n<\/p>
\n<\/p><\/div>"}, {"smallUrl":"https:\/\/www.wikihow.com\/images\/thumb\/2\/26\/Use-a-Nail-Stamper-Step-5-Version-2.jpg\/v4-460px-Use-a-Nail-Stamper-Step-5-Version-2.jpg","bigUrl":"\/images\/thumb\/2\/26\/Use-a-Nail-Stamper-Step-5-Version-2.jpg\/aid1095010-v4-728px-Use-a-Nail-Stamper-Step-5-Version-2.jpg","smallWidth":460,"smallHeight":345,"bigWidth":728,"bigHeight":546,"licensing":"
\n<\/p>
\n<\/p><\/div>"}, {"smallUrl":"https:\/\/www.wikihow.com\/images\/thumb\/4\/4e\/Use-a-Nail-Stamper-Step-6-Version-2.jpg\/v4-460px-Use-a-Nail-Stamper-Step-6-Version-2.jpg","bigUrl":"\/images\/thumb\/4\/4e\/Use-a-Nail-Stamper-Step-6-Version-2.jpg\/aid1095010-v4-728px-Use-a-Nail-Stamper-Step-6-Version-2.jpg","smallWidth":460,"smallHeight":345,"bigWidth":728,"bigHeight":546,"licensing":"
\n<\/p>
\n<\/p><\/div>"}, {"smallUrl":"https:\/\/www.wikihow.com\/images\/thumb\/4\/46\/Use-a-Nail-Stamper-Step-7-Version-2.jpg\/v4-460px-Use-a-Nail-Stamper-Step-7-Version-2.jpg","bigUrl":"\/images\/thumb\/4\/46\/Use-a-Nail-Stamper-Step-7-Version-2.jpg\/aid1095010-v4-728px-Use-a-Nail-Stamper-Step-7-Version-2.jpg","smallWidth":460,"smallHeight":345,"bigWidth":728,"bigHeight":546,"licensing":"
\n<\/p>
\n<\/p><\/div>"}, {"smallUrl":"https:\/\/www.wikihow.com\/images\/thumb\/3\/38\/Use-a-Nail-Stamper-Step-8.jpg\/v4-460px-Use-a-Nail-Stamper-Step-8.jpg","bigUrl":"\/images\/thumb\/3\/38\/Use-a-Nail-Stamper-Step-8.jpg\/aid1095010-v4-728px-Use-a-Nail-Stamper-Step-8.jpg","smallWidth":460,"smallHeight":345,"bigWidth":728,"bigHeight":546,"licensing":"